Developer Guide
- Setting up, getting started
- Design
- Implementation
- Documentation, logging, testing, configuration, dev-ops
- Appendix A: Product scope
- Appendix B: User stories
- Appendix C: Use cases
- Paperwork - For signing of paperwork related to the selling and buying of the property.
-
Appendix: Instructions for manual testing
- Launch and shutdown
-
Testing Bidder and Seller Features
- Adding a bidder while all bidders are being shown.
- Edit a bidder while all bidders are being shown.
- Delete a bidder while all bidders are being shown.
- Delete a seller while all sellers are being shown.
- Find a bidder while all bidders are being shown.
- List a bidder while only some bidders are being shown.
- Testing Property Features
- Testing Bids Features
- Testing Meeting Features
- Calendar Navigation Features
- Testing Keyboard Navigation
Setting up, getting started
Refer to the guide Setting up and getting started.
Design
Note that the diagrams shown inside the are created using Diagrams.net
Architecture

The Architecture Diagram given above explains the high-level design of the App. Given below is a quick overview of each component.
Main has two classes called Main and MainApp. It is responsible for,
- At app launch: Initializes the components in the correct sequence, and connects them up with each other.
- At shut down: Shuts down the components and invokes cleanup methods where necessary.
Commons represents a collection of classes used by multiple other components.
The rest of the App consists of four components.
-
UI: The UI of the App. -
Logic: The command executor. -
Model: Holds the data of the App in memory. -
Storage: Reads data from, and writes data to, the hard disk.
Each of the four components,
- defines its API in an
interfacewith the same name as the Component. - exposes its functionality using a concrete
{Component Name}Managerclass (which implements the corresponding APIinterfacementioned in the previous point.
For example, the Logic component (see the class diagram given below) defines its API in the Logic.java interface and exposes its functionality using the LogicManager.java class which implements the Logic interface.

How the architecture components interact with each other
The Sequence Diagram below shows how the components interact with each other for the scenario where the user issues the command delete-p 1.

The sections below give more details of each component.
UI component
{ start of ui section written by: Kor Ming Soon }
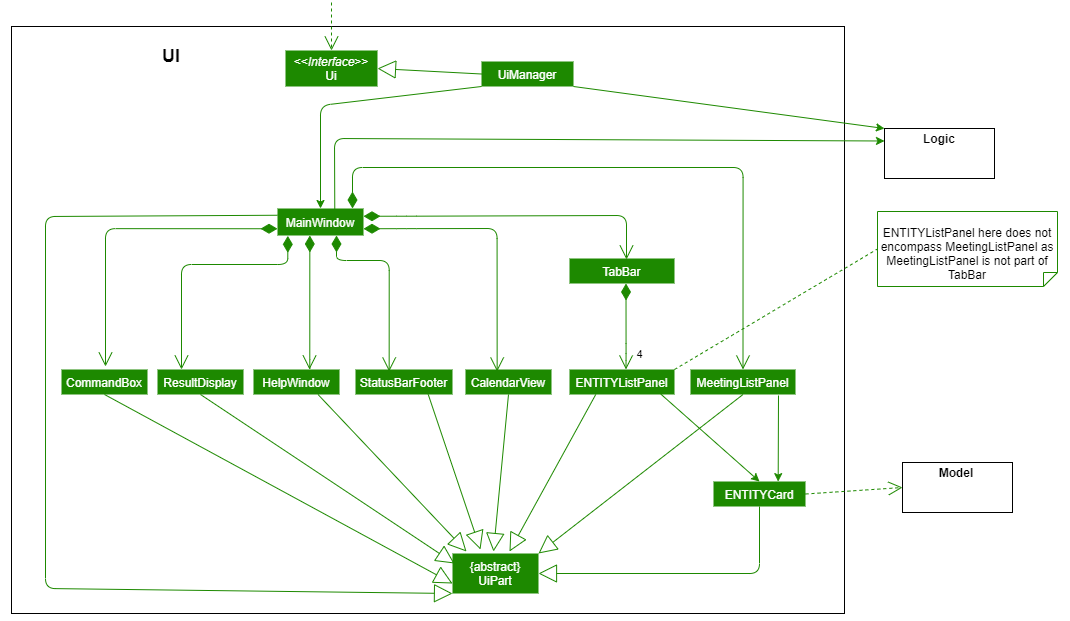
API :
Ui.java
The UI consists of two components:
MainWindowHelpWindow
MainWindow.java
MainWindow is made up of the following parts:
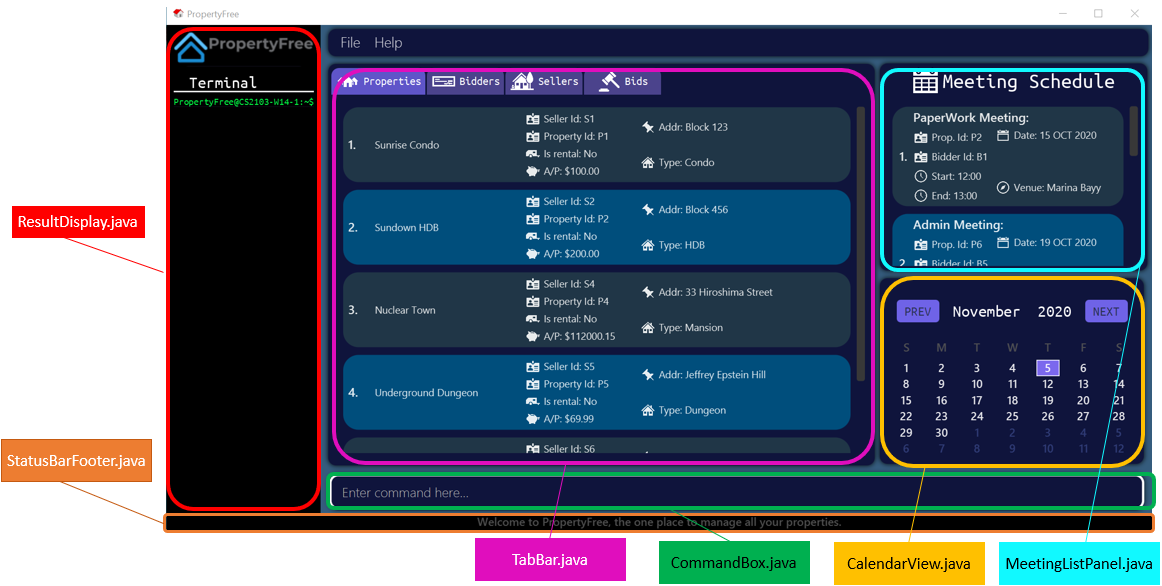 Note that the font colour in the picture is only different for visibility purposes.
After deliberation, we chose to proceed with TabBar as TabBar allowed
us to represent the details of our entities neatly.
Each entity in Property belongs to a designated ListPanel (as shown below).
The TabBar component itself consists of the following parts:
Each panel will display the list of the entities corresponding to the name of the panel.
- Alternative 1 (current choice): Choosing
TabBarto represent information of our entities.- Pros:
- Neater segmentation of entities visually
- Able to leverage on existing AB3 Ui implementation for representing
Person
- Cons:
- Requires user to click to switch tab, not CLI-centric (tackled below)
- Pros:
- Alternative 2: Maintain a single list on GUI and list only relevant entities based on certain actions such
as commands.
- Pros:
- Fewer changes to existing AB3 Ui implementation
- Cons:
- Increases code complexity as a combined list has to be created and filter accordingly
- Pros:
The thought process behind the Ui was ultimately a choice between usability of the application
and complexity of implementation.
HelpWindow.java
The HelpWindow is a pop up window that is activated upon clicking of the Help button in PropertyFree, or when the help command
is executed.
The Copy URL button would automatically copy the link of PropertyFree’s User Guide into the user’s clipboard.

All the above-mentioned components in MainWindow and HelpWindow, inherit from the abstract UiPart class.
The UI component uses JavaFx UI framework. The layout of these UI parts are defined in matching .fxml
files that are in the src/main/resources/view folder.
For example, the layout of the MainWindow
is specified in MainWindow.fxml
The UI component,
- Executes user commands using the
Logiccomponent. - Listens for changes to
Modeldata so that the UI can be updated with the modified data. - Returns what to be printed out on the UI
{ end of ui section written by: Kor Ming Soon }
Logic component

API :
Logic.java
-
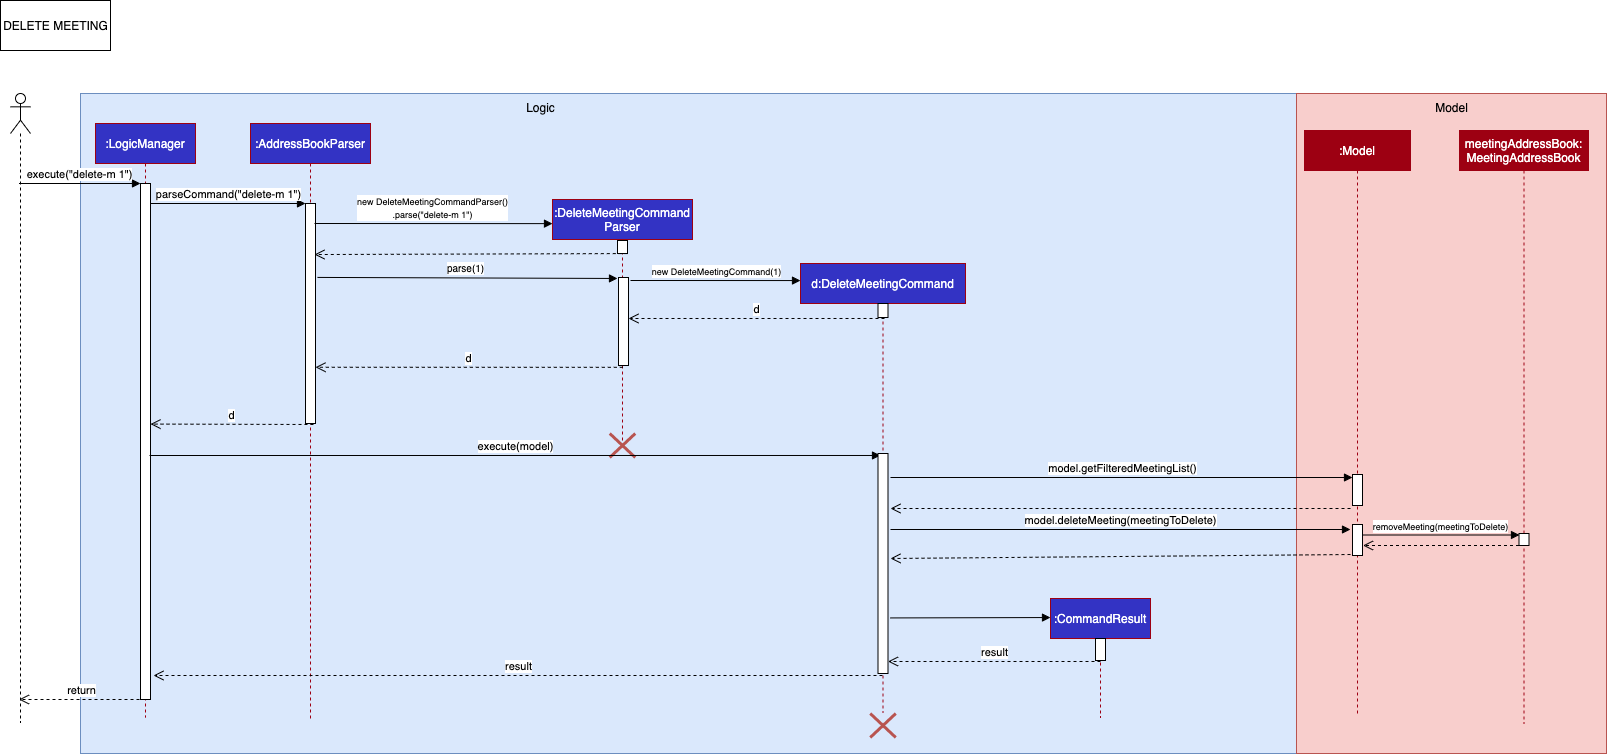
Logicuses theAddressBookParserclass to parse the user command. - This results in a
Commandobject which is executed by theLogicManager. - The command execution can affect the
Model(e.g. adding a person). - The result of the command execution is encapsulated as a
CommandResultobject which is passed back to theUi. - In addition, the
CommandResultobject can also instruct theUito perform certain actions, such as displaying help to the user.
Given below is the Sequence Diagram for interactions within the Logic component for the execute("delete-m 1") API call.
Model component
{ start of Model Component section written by: Kor Ming Soon }

API : Model.java
ENTITY represents any of the following entities in PropertyFree:Property, Seller, Bidder, Bid and Meeting
The Model,
-
stores a
UserPrefobject that represents the user’s preferences. -
does not depend on any of the other three components.
- stores the following
ENTITYbook data which consists of the following:PropertyBookSellerAddressBookBidderAddressBookMeetingBookBidBook
-
exposes an unmodifiable
ObservableList<ENTITY>that can be ‘observed’ by the UI component.e.g. The UI is bounded to the 5 different lists so that the UI automatically updates when the data in any of the lists are changed.
The following segment of the Model components further breaks down each ENTITY for a more elaborate
explanation of each entities’ design.
- Bidder and Seller
- Property
- Bid
- Meeting
Bidder and Seller
The following class diagram depicts how the Bidder and Seller are created. The Bidder and Seller both extend from the
abstract ClientPerson which in turn extends from abstract Person.
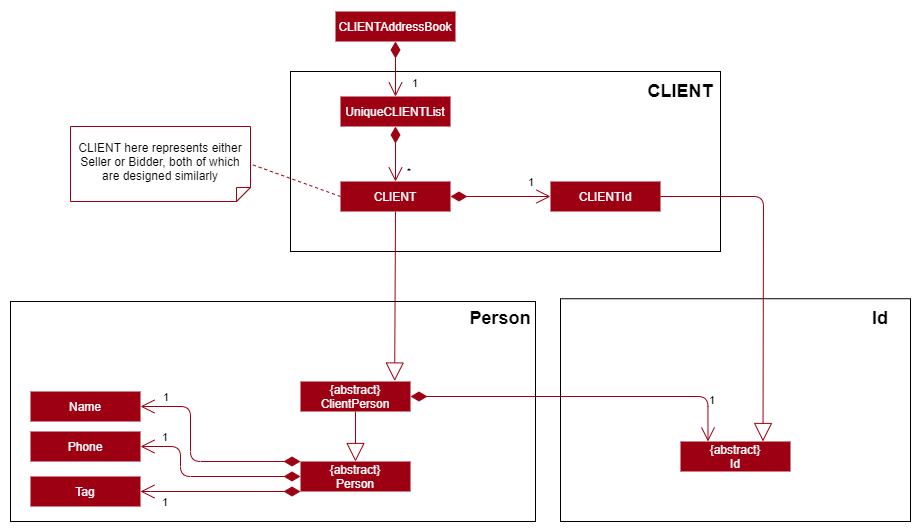
Note that the CLIENTId (BidderId / SellerId) design is elaborated in Id in the following segment.
Design Considerations
- Alternative 1 (current choice): Extending
BidderandSellerfromClientPerson, andClientPersonfromPerson- Pros:
- Neater segmentation of entities
- Easier extensibility for additional entities who require an
Idin the future if necessary (e.g Person representing an organization or company)
- Cons:
- Increased code complexity
- Pros:
- Alternative 2: Extending
BidderandSellerdirectly fromPerson- Pros:
- Sufficient and possible coverage for current requirements of PropertyFree
- Lesser code complexity
- Lesser changes to AB3 code base
- Cons:
- Lesser extensibility and increased possibility of coupling if more entities are introduced
- Pros:
- Alternative 3 (current choice): Changing
TagfromSet<Tag>in original AB3 implementation- Pros:
- Lesser code complexity and fewer testing required for extension
- Better suited for PropertyFree’s purpose as a client management system where the purpose of the client is already
well specified without need for
Set<Tag> - Improved UI by having
Tagacting as a form of visual identifier, instead of complete removal ofTag
- Cons:
- Refactoring from original AB3 implementation required substantial time
- Pros:
Tagwas kept inPersoninstead ofClientPersonto reduce refactoring required from AB3.
{ End of Model Component section written by: Kor Ming Soon }
ID
{ Start of Id Model section written by: Dianne Loh and Kor Ming Soon }
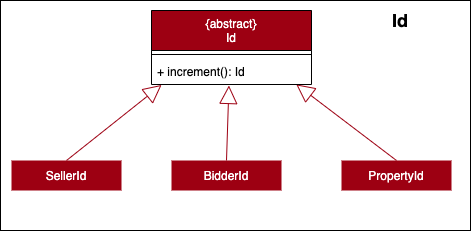
The follow class diagram depicts the design behind Id and the subclasses: SellerId, BidderId and PropertyId.
{ End of Id Model section written by: Dianne Loh and Kor Ming Soon }
Property
{ Start of Property Model Component section written by: Dianne Loh }
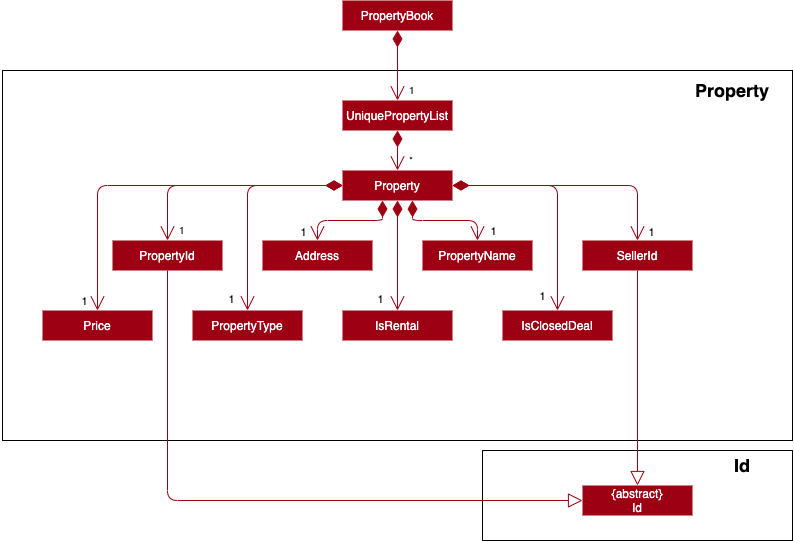
The following class diagram depicts Property and its related classes.
Design Considerations
The implementations of PropertyType and Address are similar as they both are wrapper classes of a String. This implementation is justified because of the following considerations:
- Alternative 1 (current choice): Implementing
PropertyTypeandAddressas separate classes.- Pros:
- Better adherence to the separations of concerns principle by separating code related to
PropertyTypeandAddress - Easier extensibility for the classes to contain more specific attributes. For example,
Addresscan be extended to contain more specific attributes, such as road name, block and postal code, etc.
- Better adherence to the separations of concerns principle by separating code related to
- Cons:
- More code duplication (for now)
- Pros:
- Alternative 2:
PropertyTypeandAddressextends from a parent class.- Pros:
- Less code duplication (for now)
- Cons:
- Less extensible
- Modifying the behaviour of one type will affect the other
- Pros:
{ End of Property Model Component section written by: Dianne Loh }
Bid
{ start of Bid Model Component section written by: Marcus Duigan Xing Yu }
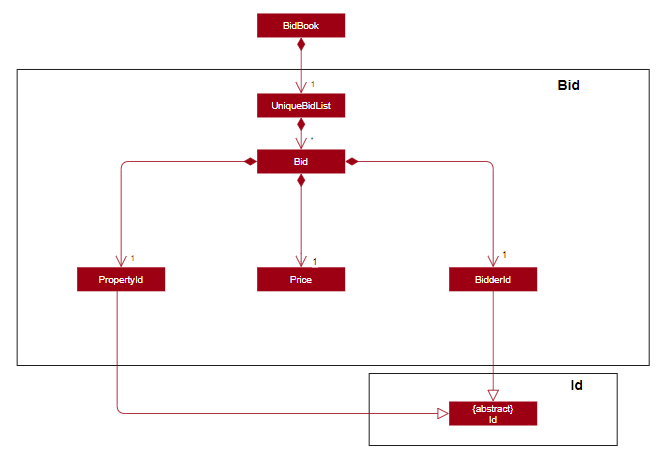
The following class diagram depicts how a Bid is created.
Design Considerations
- Alternative 1 (current choice): Do not give bids its own Bid Id.
- Pros:
- A bid is already unique as it cannot have the same property id and bidder id for two separate bids. Thus having a unique bid Id over complicates the bid for no reason
- Cons:
- The user must know the bidder Id and property Id to find the exact bid instead of using a bid Id
- Pros:
- Alternative 2: Give a specific Id to the bids.
- Pros:
- Can track how many bids have been made
- Easier for users to execute certain commands aka delete-bid
- Cons:
- More complicated
- Having a bid Id does not help other entities
- Pros:
- Alternative 3: Create a bid specific to a property and have a list of bidders as a parameter.
- Pros:
- Associates all bidder Id’s to a specific property
- Easier to track if there is a duplicate bidder for a certain bid
- Cons:
- Difficult to edit specific bids in terms of parameters
- Difficult to find all bids related to a specific bidder
- Pros:
{ end of Bid Model Component section written by: Marcus Duigan Xing Yu }
Meeting
{ start of Meeting Model Component section written by: Harsha Vardhan }
The following class diagram depicts how the different types of meetings are being created. The Admin, Paperwork and Viewing meeting types extend from the
abstract Meeting.
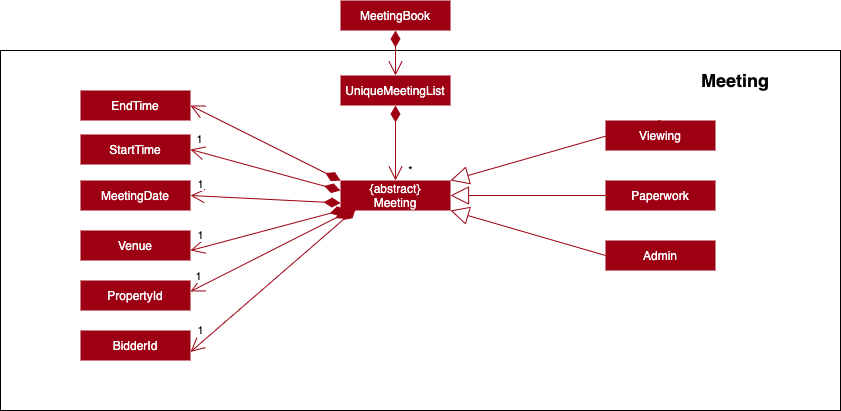
As seen from the diagram above there are three subtypes of Meetings: Admin, Paperwork and viewing. Each of the meeting
types then contain the attributes of BidderId, PropertyId, Venue, MeetingDate, StartTime and EndTime.
Design Considerations
- Alternative 1 (current choice): Extending
Admin,PaperworkandViewingfrom an abstractMeeting- Pros:
- Neater segmentation of the different meeting types
- Easier extensibility for additional other types of meeting in the future
- Cons:
- Increased code complexity
- Pros:
- Alternative 2: Identifying the different meeting types through a flag that stores the type of the meeting as a string
- Pros:
- Minimal code will be required as the same class can be used to instantiate the different meetings
- Lesser code complexity
- Less repetition of code
- Cons:
- Less extensibility because it is difficult to include new methods for a specific type
- Pros:
{ End of Meeting Model Component section written by: Harsha Vardhan }
Storage component
{ Start of Storage Component section written by: Harsha Vardhan }
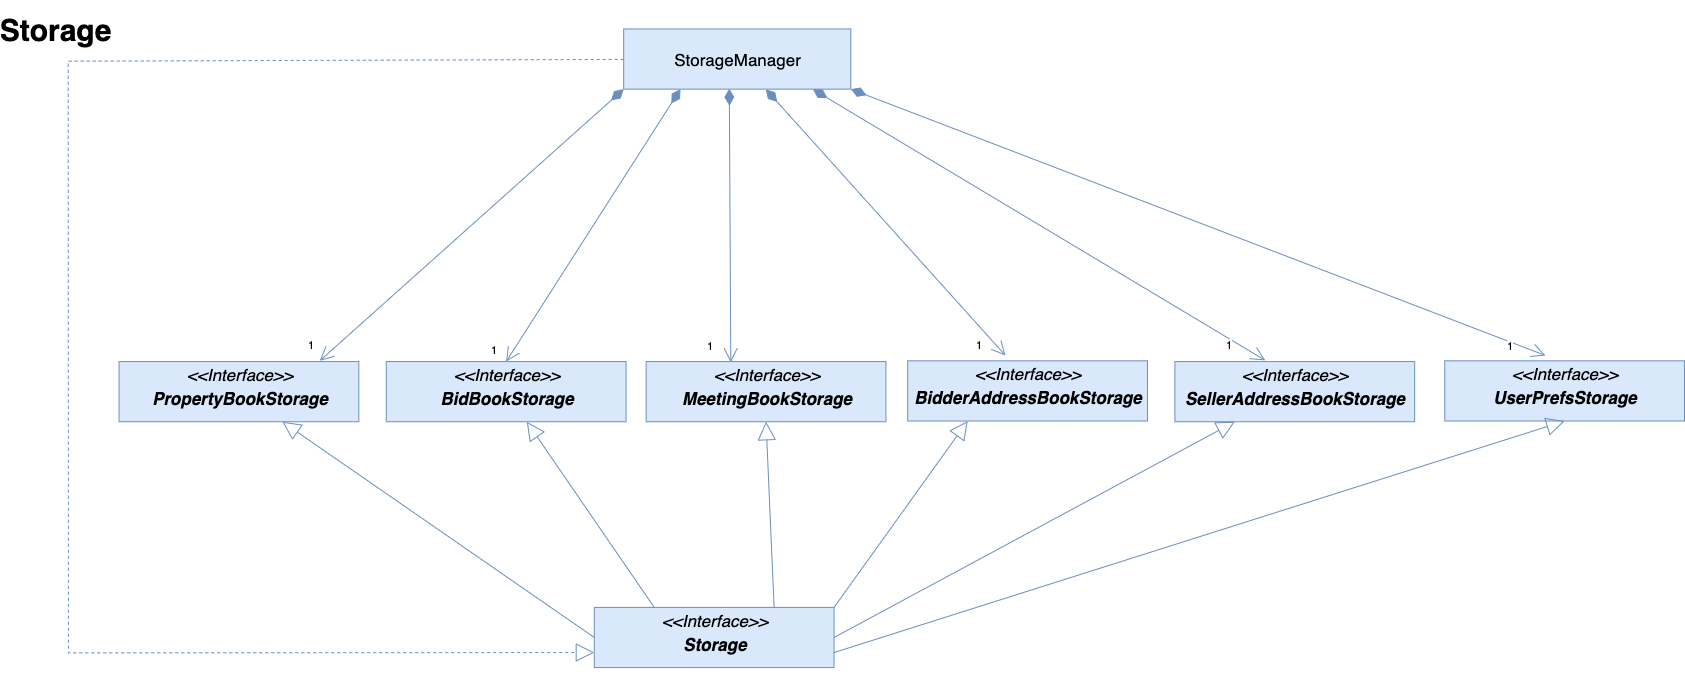
API : Storage.java
The Storage component,
- implements all the the different storage types as shown in the diagram above.
- can save
UserPrefobjects in json format and read it back. - can save the various storage books we have in json format and read it back.
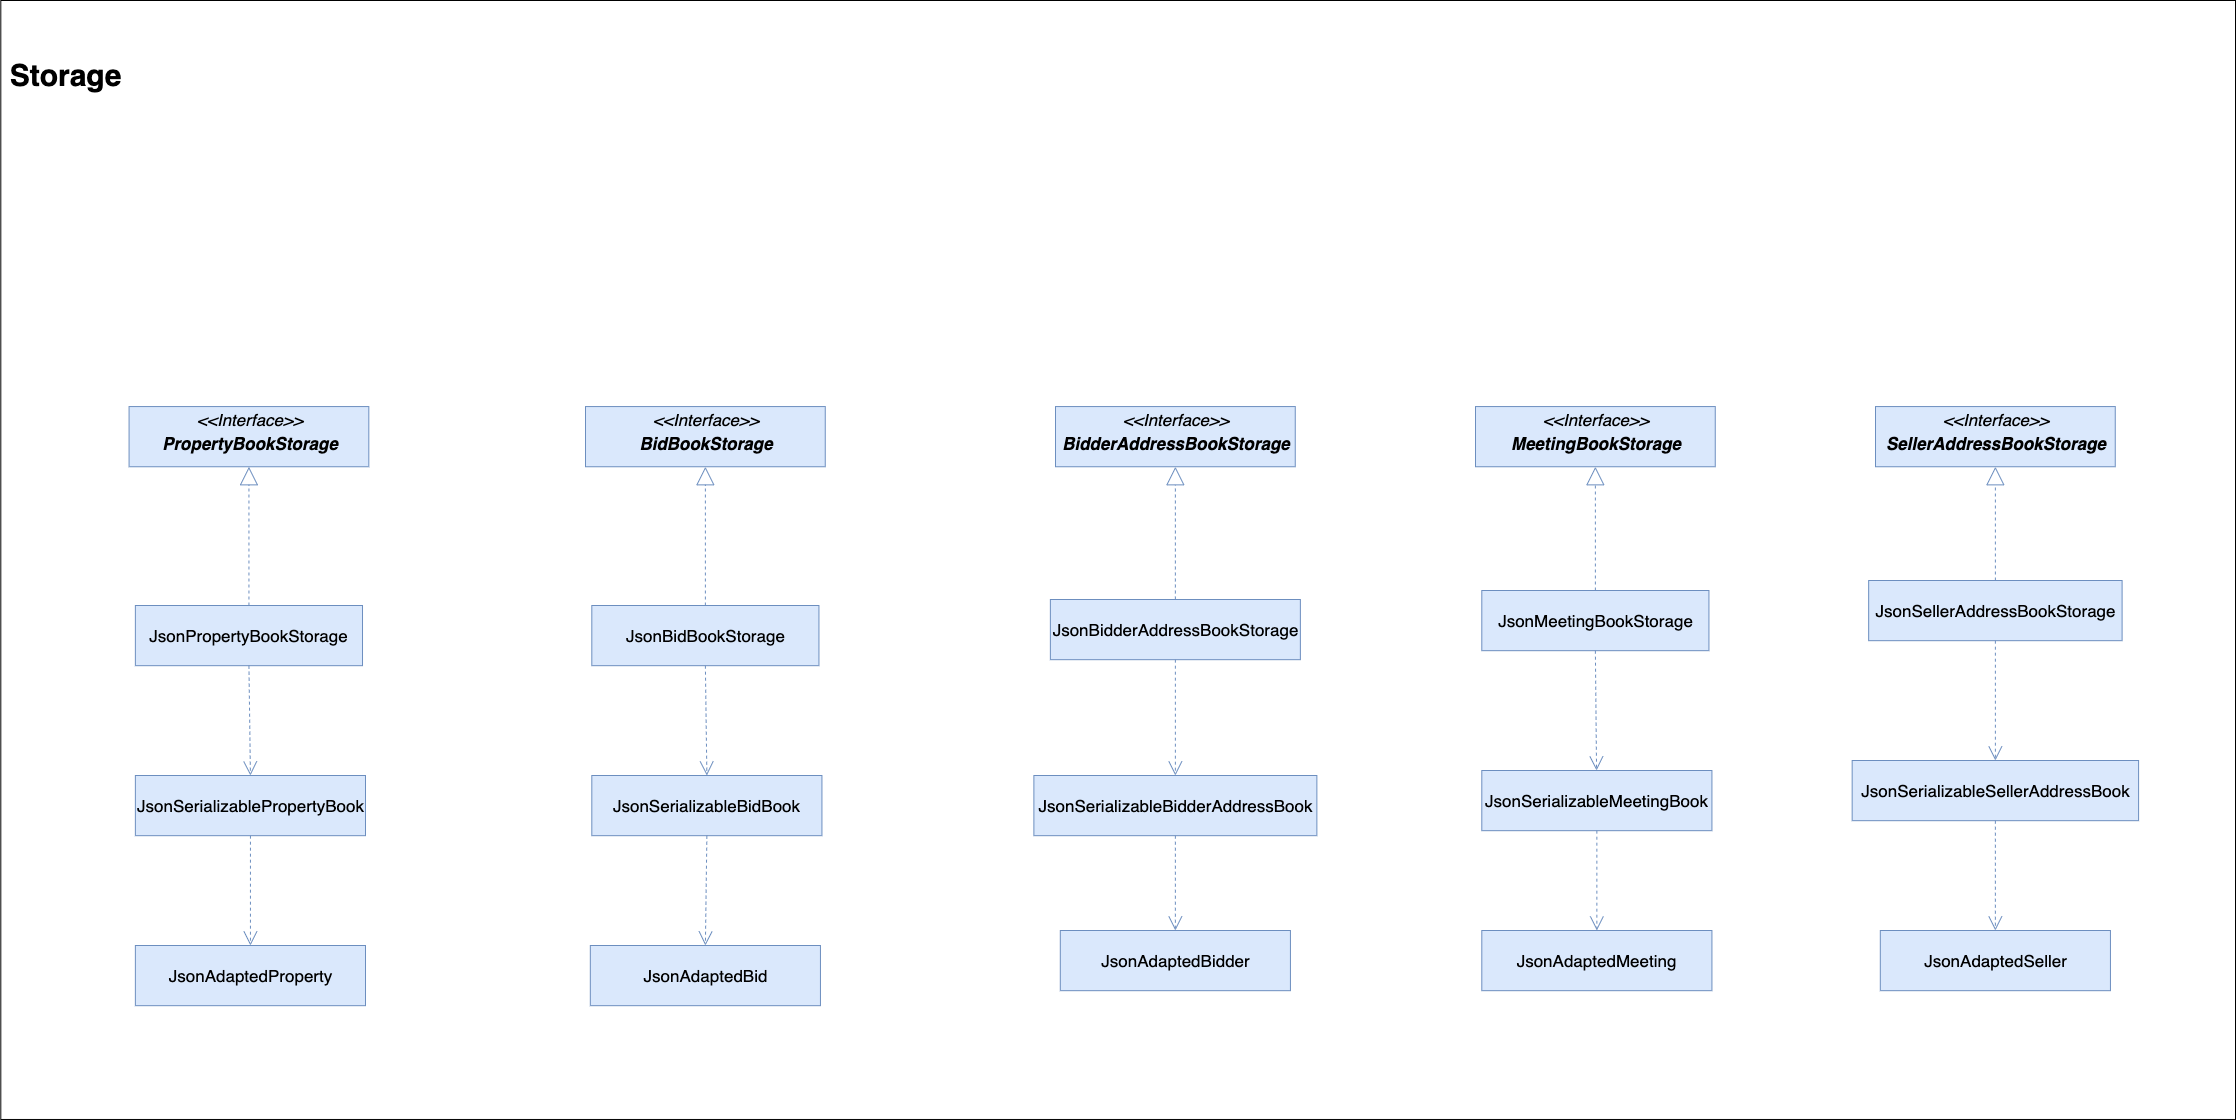
The above shows the further implementations of each individual storage component. For the storage components,
- the implementations across the different types of storage is similar.
- the different JsonENTITYBookStorage is responsible for saving the datas in json format. For example, let’s take a look at PropertyBookStorage. The JsonPropertyBookStorage will store all the data that is associated with property in the file in json format. In the JsonAdaptedProperty, there will be all the attributes that are associated with property that will eventually be stored in json format. The other storage books do follow a similar implementation.
Design Consideration
- Alternative 1 (current choice): Have different storage for the different entities.
- Pros: Easier to implement and do not require refactoring for the existing code base. The code can be reused and extended easily for the various entities. It will be easier to debug and find mistakes as when something goes wrong with a particular entity it will be easier to know which entity is affected.
- Cons: There will be a lot of files with repetitive code.
- Alternative 2: Use the current AddressBookStorage and modify it to contain the different entities.
- Pros: Everything will be in one single folder and it will be easier to access the code. There will not be multiple repeats of the same code across the different files.
- Cons: The code file might become huge and might become difficult to debug when there is an error.
{ End of Storage Component section written by: Harsha Vardhan }
Common classes
Classes used by multiple components are in the seedu.addressbook.commons package.
Implementation
This section describes noteworthy details on how certain features are implemented. The details of the features are categorized accordingly to the features:
AddEditFindSortDeleteList
Additional features apart from the above-mentioned feature includes:
- Automated change of
TabBarandENTITYListPanelwith corresponding ENTITY command -
nextandprevcommand for Calendar UI Navigation - Key-press for UI navigation
1. Add
{ start of Add section written by: Marcus Duigan Xing Yu}
The Add command applies to all entities in PropertyFree. Apart from AddBidCommand, AddMeetingCommand and AddPropertyCommand with slight differences in implementation (elaborated below), all other entities follow the same
implementation.
-
When the
Addcommand is executed by the user, the input it passed into theLogicManagerand thereafter parsed and identified inAddressBookParser. -
Upon identifying the relevant
COMMAND_WORDand by extension theENTITY(through the-input) , the correspondingAddENTITYCommandParserobject is formed. The user input then goes through another level of parsing inAddENTITYCommandParser. -
The
AddENTITYCommandParseridentifies the parameters corresponding to the user’s input, and a newAddENTITYCommandobject is formed taking in the identified parameters. TheAddENTITYCommandis then encapsulated underCommandand passed back into theLogicManager. -
The
AddENTITYCommandcallsexecute(model). The execution of the command then interacts with theModelcomponent, and retrieves the unmodifiable view ofObservableList<ENTITY>. -
The
Modelaccesses the relevant ENTITYBook and adds the object to the ENTITYBook. TheUithen “listens” to the changes in the ENTITYBook and updates the GUI. -
Finally,
AddENTITYCommandis then encapsulated as aCommandResultand passed into theLogicManager.
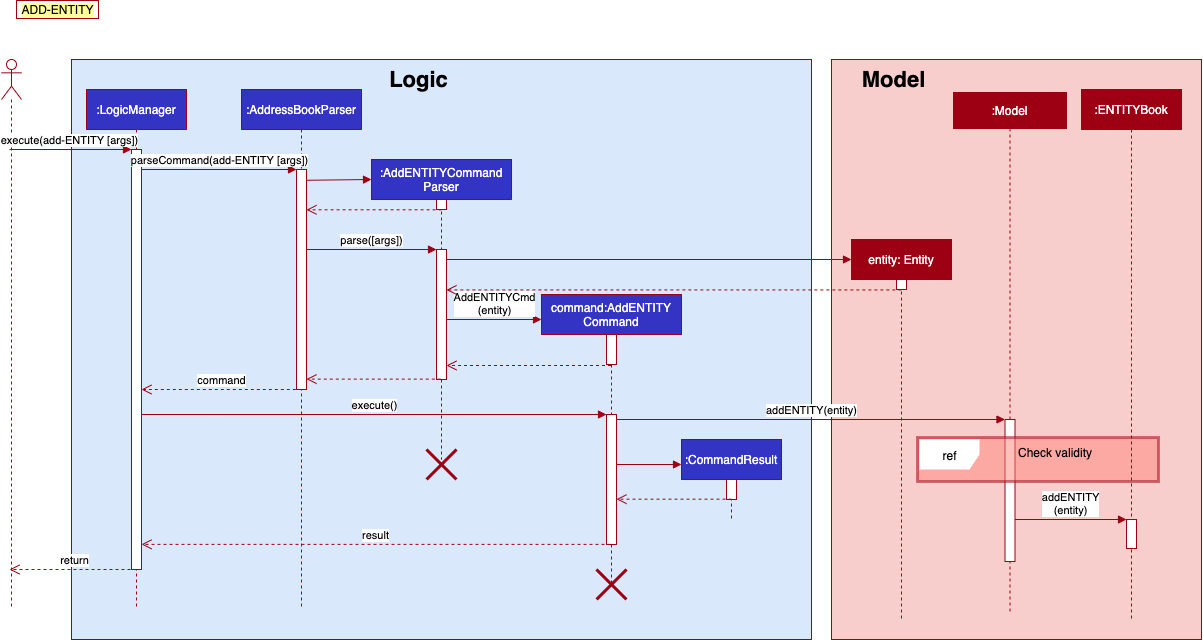
1.1 Add Bid Command
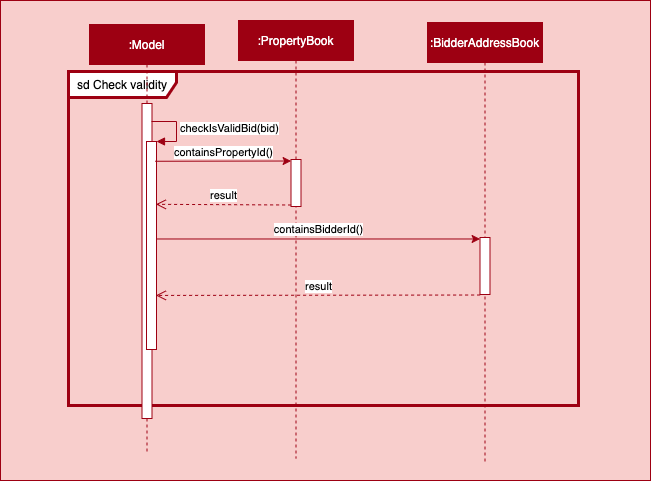
-
For Add-bid Command and Add-Meeting Command they have an additional step of checking whether the user inputs for bidder Id and property Id are valid before adding to the Bidbook or MeetingBook as seen in the diagram above.
-
For add-bid command, it also contains an auto-sort feature where it will call a sort-bid method which ensures the list is always sorted by property Id followed by Bid Amount. For further clarification, refer to section 4. Sort for a more in depth description.
{ End of Add section written by: Marcus Duigan Xing Yu}
1.2 Add Property Command
{ start of Add Property section written by: Dianne Loh }
The implementation of the Add Property feature includes an additional validity check to ensure that the seller id exists. Below is the sequence diagram for the check validity frame:
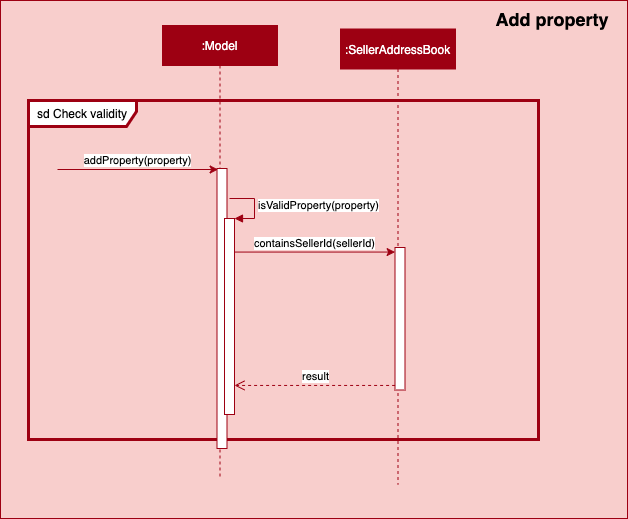
If the check returns false, an InvalidSellerIdException is thrown.
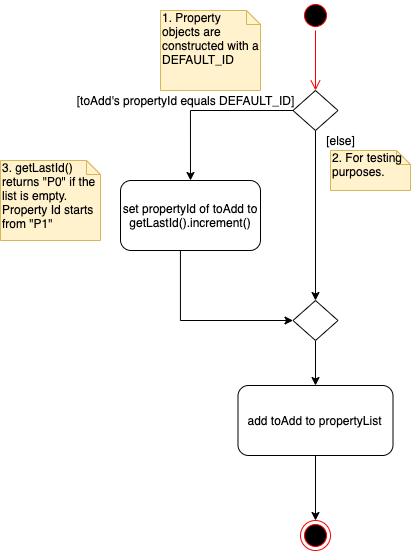
UniquePropertyList, the PropertyId of each property is automatically incremented according to the activity diagram below:
{ End of Add Property section written by: Dianne Loh }
2. Edit
{ start of Edit section written by: Christopher Mervyn}
The Edit command applies to all entities in PropertyFree.
-
When the
Editcommand is executed by the user, the input is passed into theLogicManagerand thereafter parsed and identified inAddressBookParser. -
Upon identifying the relevant
COMMAND_WORDand by extension theENTITY(through the-input) , the correspondingEditENTITYCommandParserobject is formed. The user input then goes through another level of parsing inEditENTITYCommandParser. -
The
EditENTITYCommandParseridentifies the parameters corresponding to the user’s input, and a newEditENTITYDescriptorobject is formed with the correspondingsetENTITYmethod to be called. TheEditENTITYDescriptorwill set the parameter as accordance with the user input. andEditENTITYCommand -
After which, the
EditENTITYCommandParserwill create a newEditENTITYCommandobject from the result of the correspondingsetENTITYmethod. TheEditENTITYCommandis then encapsulated underCommandand passed back into theLogicManager. -
The
EditENTITYCommandcallsexecute(model). The execution of the command then interacts with theModelcomponent, and retrieves the unmodifiable view ofObservableList<ENTITY>. -
The
Modelaccesses the relevantENTITYBookand adds the object to theENTITYBook. TheUithen “listens” to the changes in theENTITYBookand updates the GUI. -
Finally,
EditENTITYCommandis then encapsulated as aCommandResultand passed into theLogicManager.
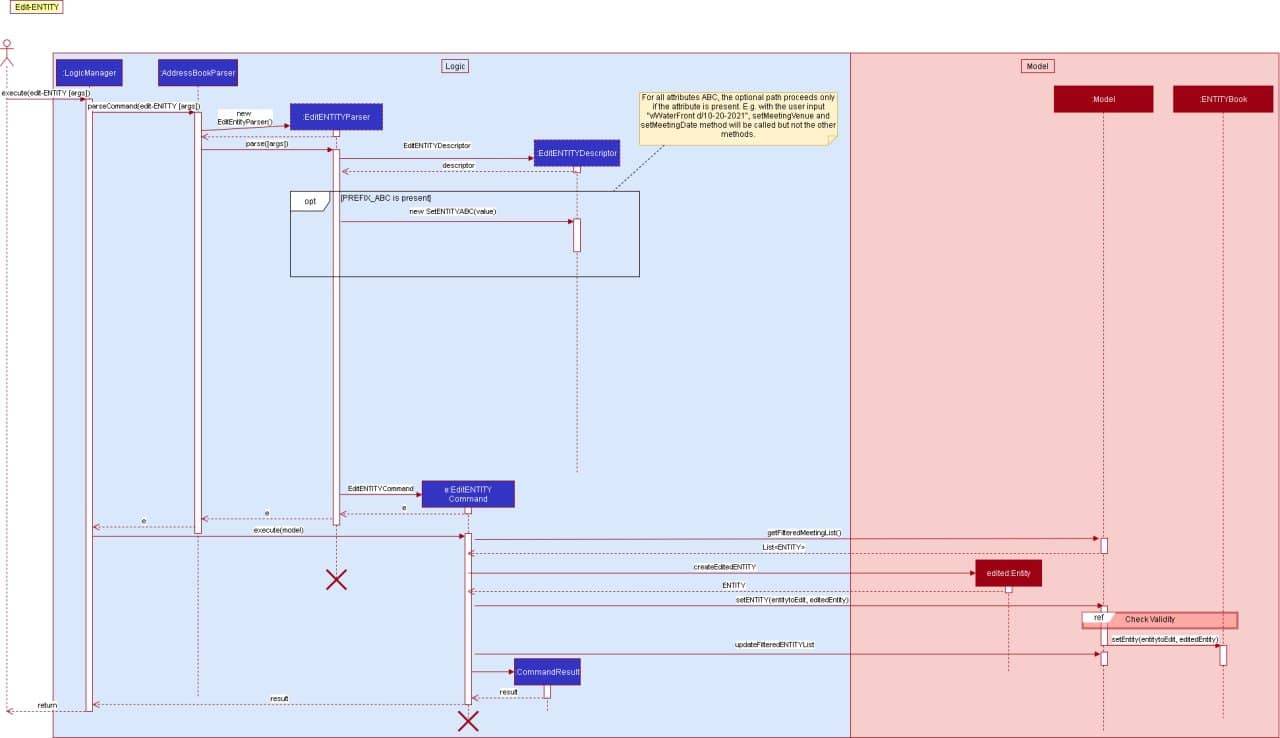
2.1 Edit Entity Validity Check
Below is an example of how a meeting object to be edited will ensure that a valid property Id and bidder Id are supplied by the user, this is similar to the add command validity check from above:

The property Id and bidder Id are checked in their respective unique books as seen before adding the new edited meeting to the meeting book.
Edit Bid Command and Edit Property Command will also do the validity check as described in its Add ENTITY section.
{ End of Edit section written by: Christopher Mervyn}
3. Find
{ Start of Find section written by: Dianne Loh }
The Find command applies to all entities in PropertyFree. There are two implementations of Find:
- One-Predicate Implementation (for
Bid,BidderandSeller) - Multi-Predicate Implementation (for
PropertyandMeeting)
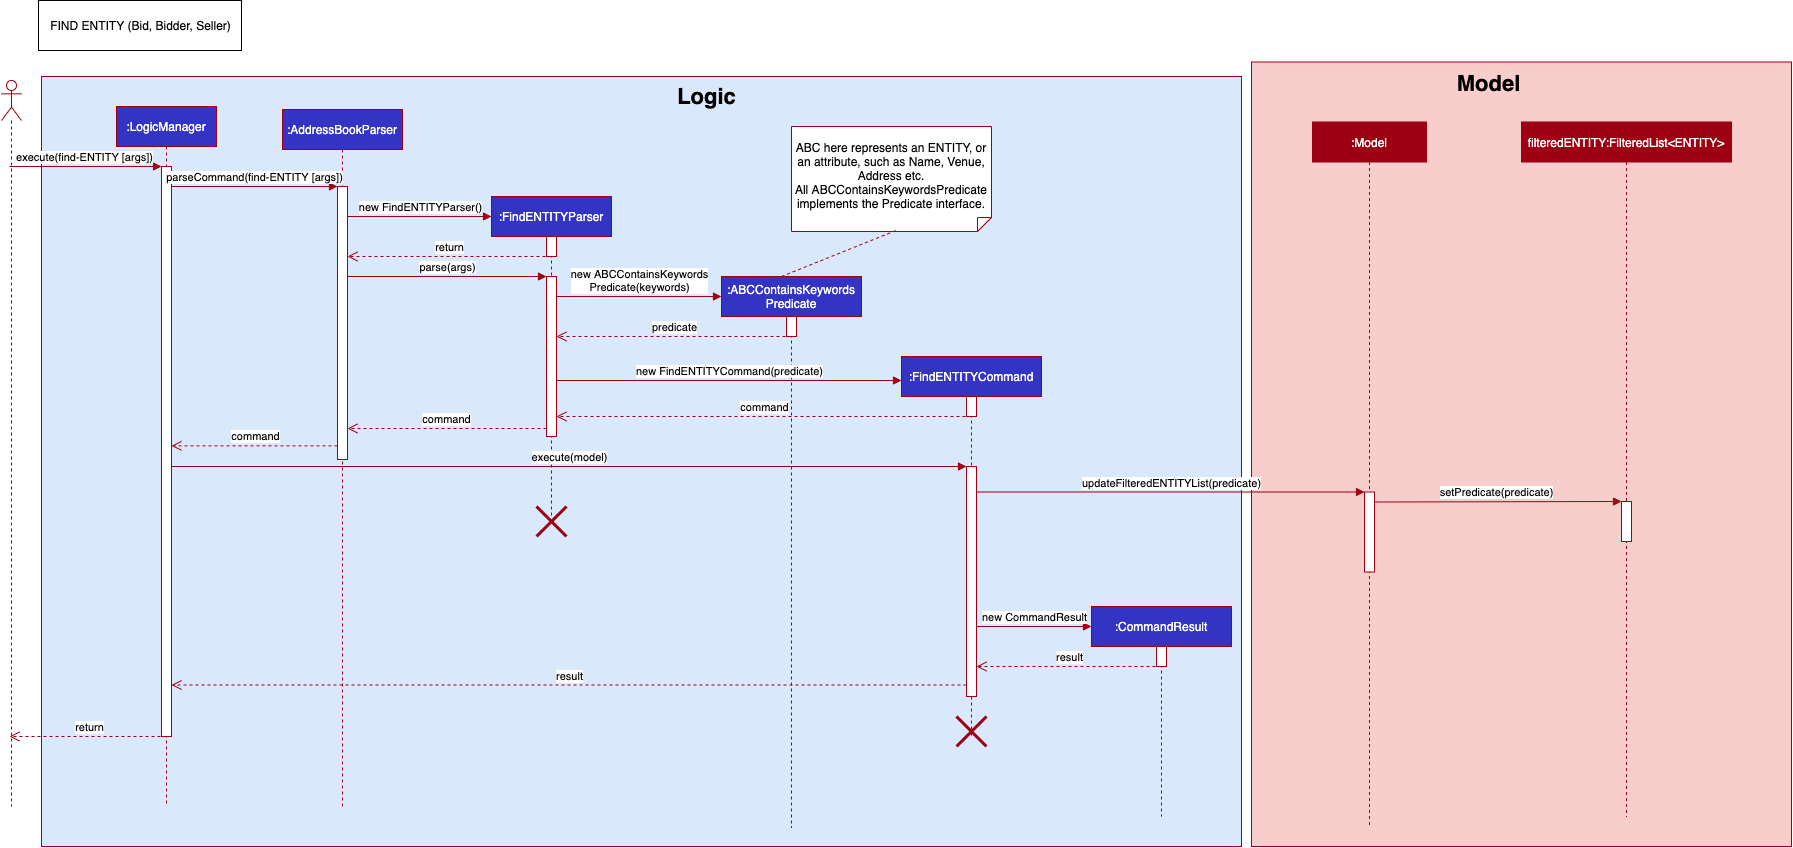
3.1 One-Predicate Implementation of FindENTITYCommand (for Bid, Bidder and Seller only)
- When the
Findcommand is executed by the user, the input is passed intoLogicManagerand then parsed inAddressBookParser. - Upon identifying the
COMMAND_WORDFindand the entity from the inputfind-ENTITY, the relevantFindENTITYCommandParseris created. - The
FindENTITYCommandParserparses the arguments into anABCContainsKeywordsPredicate, whereABCrepresents an attribute, creates aFindENTITYCommandwith the predicate and returns the command to theLogicManager. - The method
execute(model)ofFindENTITYCommandis called, which updates thefilteredENTITYlist inModelManagerby setting the predicate. - The GUI “listens” to the changes in the filtered list and updates its display.
- Finally, a
CommandResultis returned toLogicManagerto display the feedback to the user.
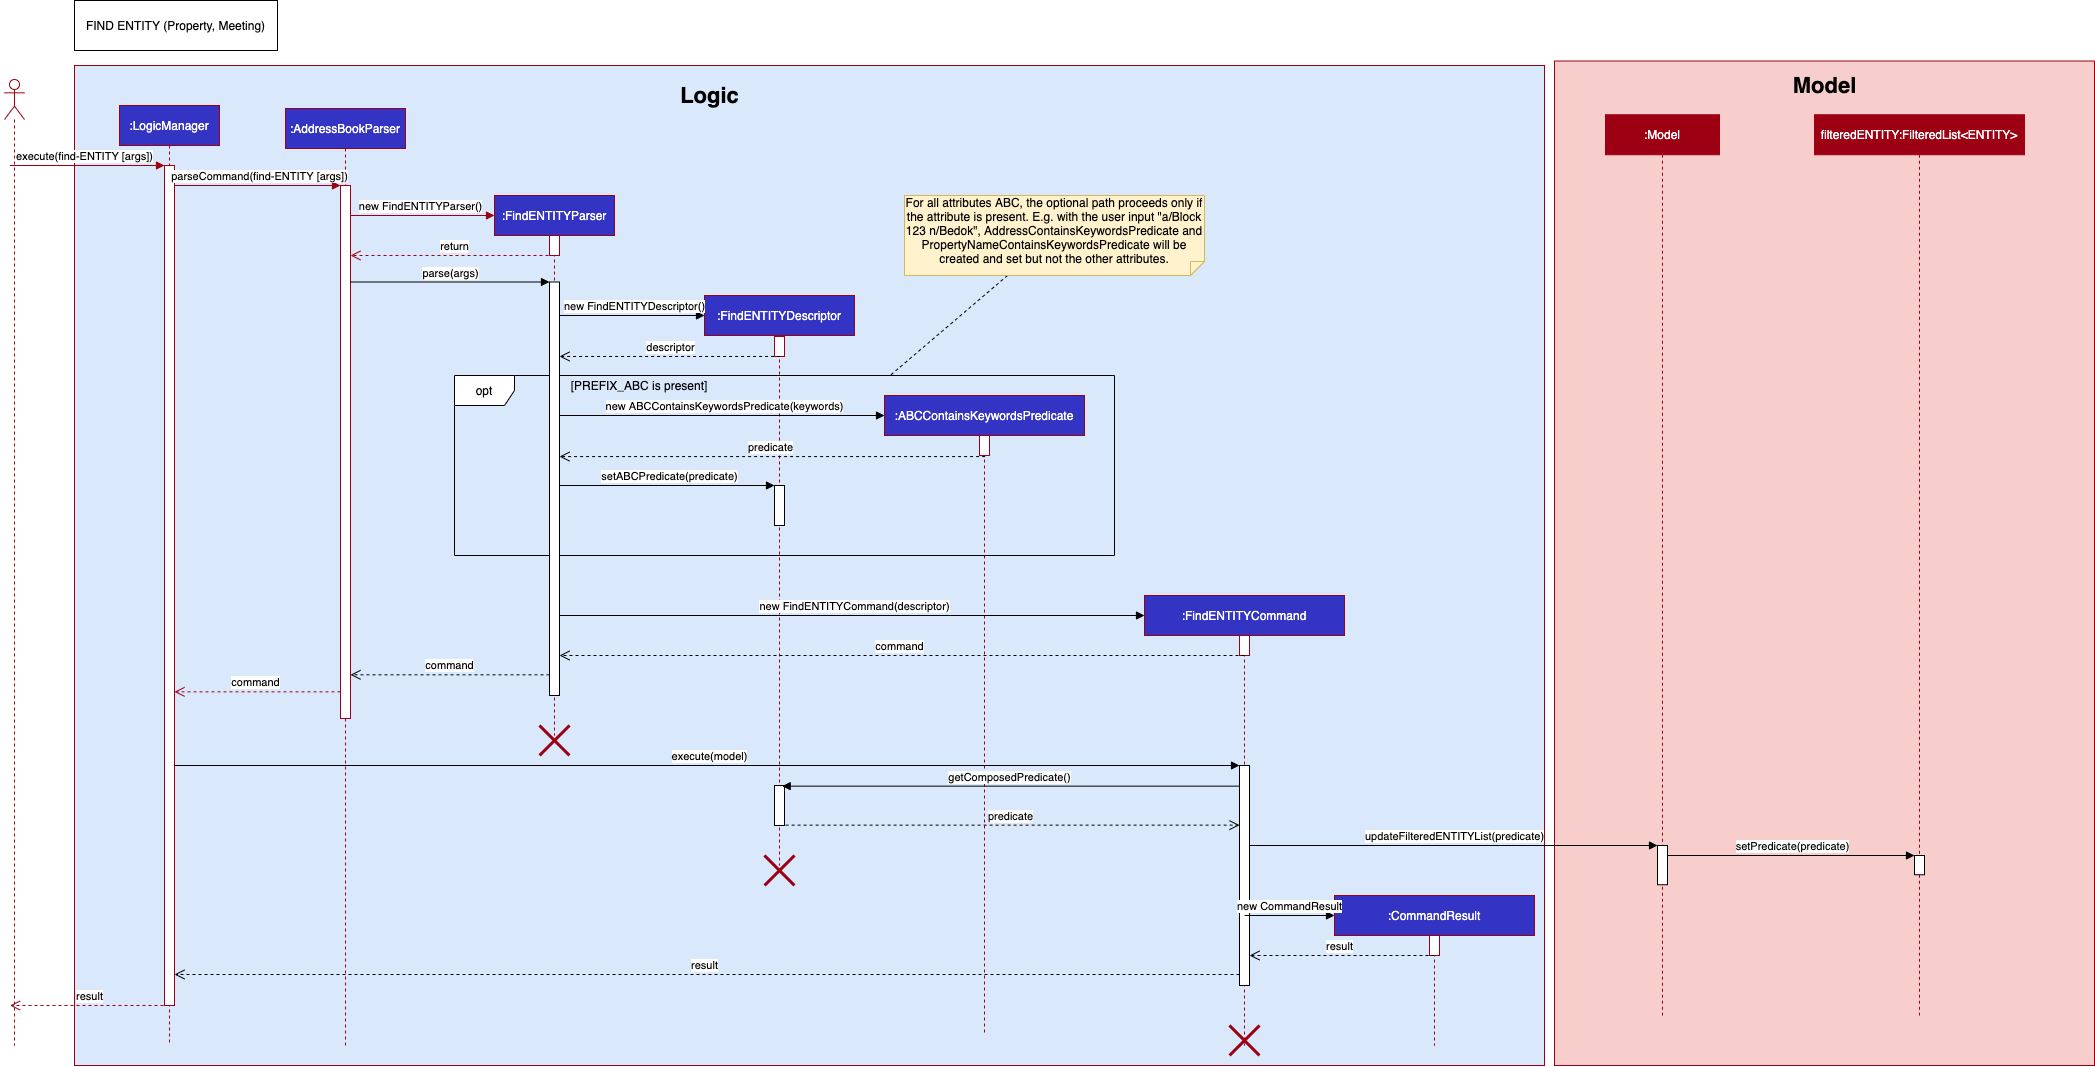
3.2 Multi-Predicate Implementation of FindENTITYCommand (for Property and Meeting only)
This implementation differs from the One-Predicate implementation only in steps 3 and 4:
Step 3: The FindENTITYCommandParser creates a FindENTITYDescriptor. For each prefix (eg n/...) in the input, the FindENTITYCommandParser parses the arguments into the relevant ABCContainsKeywordsPredicate and sets the ABCContainsKeywordsPredicate of the FindENTITYDescriptor. The FindENTITYCommandParser then creates a FindENTITYCommand with the FindENTITYDescriptor, which is returned to LogicManager.
Step 4: execute(model) of FindENTITYCommand gets the composed predicate from FindENTITYDescriptor and passes the predicate to ModelManager to update the FilteredENTITY list.
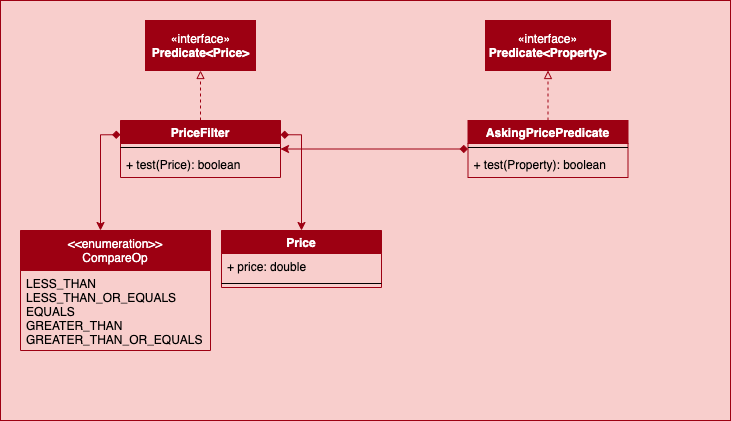
AskingPricePredicate is a special type of Predicate that tests if a Property’s askingPrice passes the PriceFilter, whose class diagram is as follows:
{ End of Find section written by: Dianne Loh }
4. Sort
{ Start of Sort section written by: Harsha Vardhan}
The Sort command applies to Meeting and Bids in PropertyFree. Both SortMeetingCommand and the SortBidCommand
follow similar implementations with slight differences. The SortBidCommand is slightly different as it has an auto-sort
feature when bids are added or edited. Below we will look into the implementation of the SortMeetingCommand.
The sort meeting feature sorts the meetings based on the different dates of the meetings from the earliest meeting to the last meeting in chronological order.
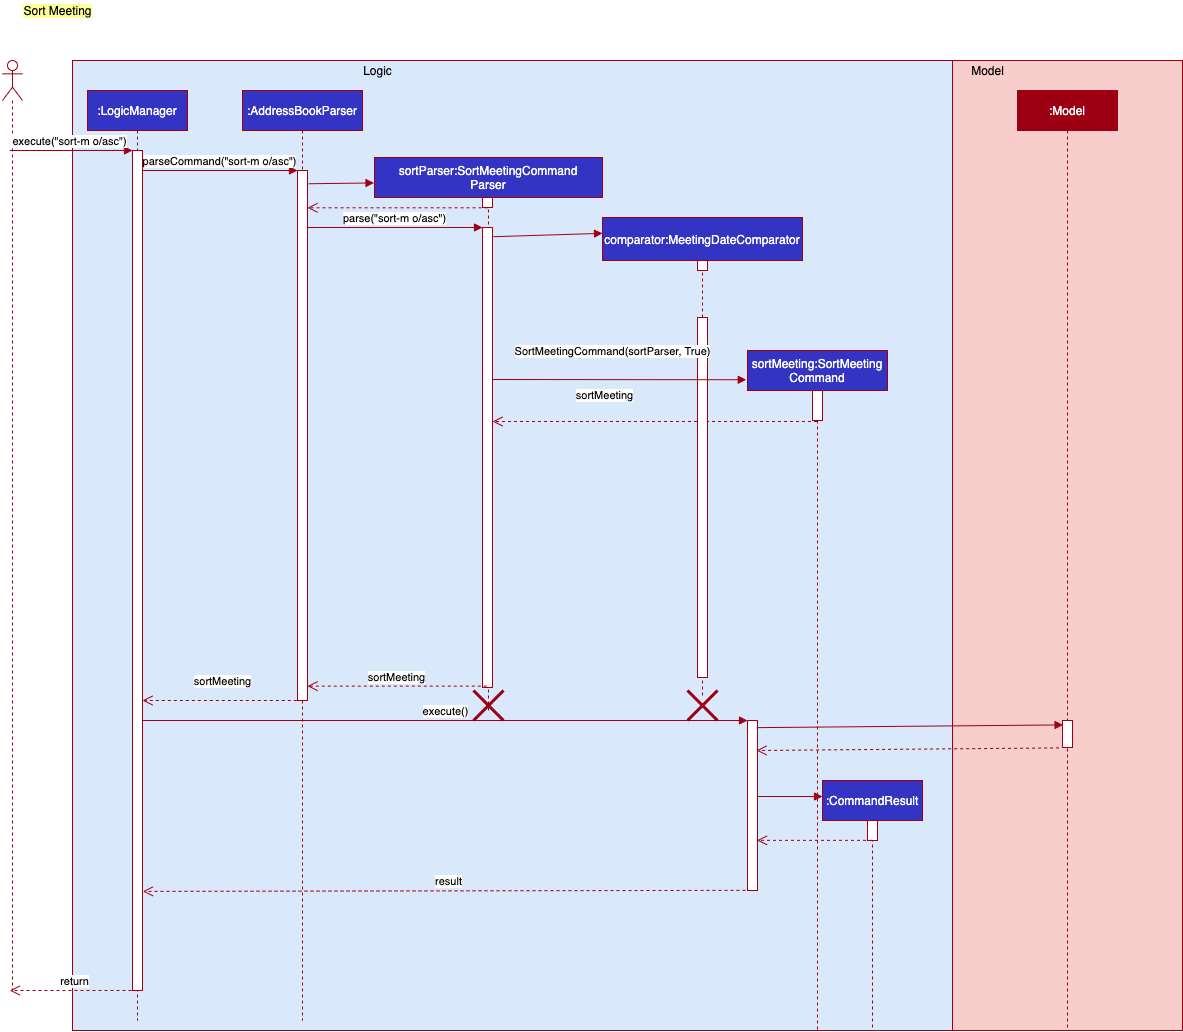
- When the
sort-mcommand is executed by the user, the input it passed into theLogicManagerand gets parsed and identified inAddressBookParser. - Upon identifying the relevant
COMMAND_WORDand by extension theENTITY(through the-input) , the correspondingSortMeetingCommandParserobject is formed. The user input then goes through another level of parsing inSortMeetingCommandParser - The
SortMeetingCommandParseridentifies the order in which the meetings are to be sort and creates aSortMeetingComparatorcomparator object accordingly. - The
SortMeetingCommandParsercreates aSortMeetingCommandwith the above comparator. The command is returned to theLogicManager. - The
LogicManagercallsSortMeetingCommand#execute(), which adds a new duplicate list of meetings that is sorted in chronological order inMeetingBookvia theModelinterface. - Finally, a
CommandResultwith the relevant feedback is returned to theLogicManager.
Design Considerations
For the SortMeetingCommand, we had several considerations that we made on whether to sort the list manually through
the sort-m command or to automatically sort the list for every meeting that is added or edited.
-
Alternative 1 (current choice): User has the option to sort the list manually in both ascending and descending format. The meeting list will not be automatically sorted when a meeting has been added or changed.
- Pros:
- If the user types in wrong information for a certain meeting, he is able to see the meeting at the bottom rather than filtering through a sorted list which makes it easier to fix the error that he has made.
- Code will be easier to implement as we so not need to implement the auto sort phase.
- Cons:
- User has to manually sort the list, using the
sort-mcommand, after keying in the new meetings to obtain an ordered meeting list.
- User has to manually sort the list, using the
- Pros:
-
Alternative 2: The meeting list will be automatically sorted every time the user makes a new meeting or edits one.
- Pros:
- Meetings will always be in chronological order and user does not have to key in any command to sort the list.
- Cons:
- If the user adds in a meeting with wrong details to a huge list of meetings, it will be difficult to find the meeting. If the previous method was used the new meting added will be at the bottom of the list.
- The code will be much more complex compared to alternative 1.
- User will not be have the ability to sort the list in different orders.
- Pros:
{ end of Sort section written by: Harsha Vardhan}
4.1 Auto-Sort Feature for add-bid and edit-bid
{ start of Add/Edit auto-sort feature section written by: Marcus Duigan Xing Yu}
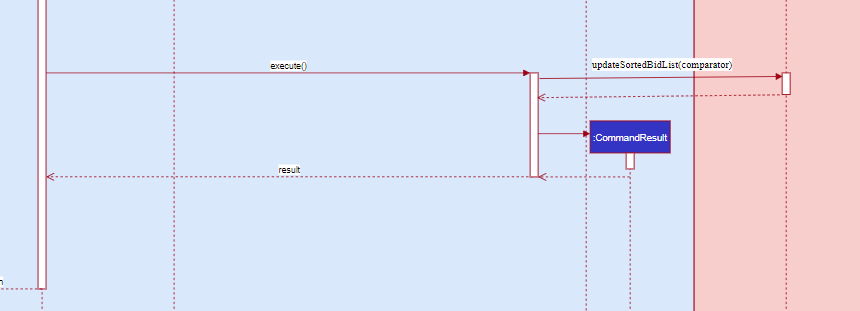
During the execution of add-bid and edit-bid command in the model manager, it executes a sort function similar to the above diagram’s execution stage. The method names that are
called instead are updateSortedBidList(bidComparator) which is called after the addBid/updateFilteredBidList method is called.
{ end of Add/Edit auto-sort feature section written by: Marcus Duigan Xing Yu}
5. Delete
{ start of Delete section written by: Kor Ming Soon }
The Delete command applies to all entities in PropertyFree. Apart from DeletePropertyCommand, DeleteBidderCommand
and DeleteSellerCommand with slight differences in implementation (elaborated below), all other entities follow the same
implementation.
-
When the
Deletecommand is executed by the user, the input it passed into theLogicManagerand thereafter parsed and identified inAddressBookParser. -
Upon identifying the relevant
COMMAND_WORDand by extension theENTITY(through the-input) , the correspondingDeleteENTITYCommandParserobject is formed. The user input then goes through another level of parsing inDeleteENTITYCommandParser. -
The
DeleteENTITYCommandParseridentifies theIndexcorresponding to the user’s input, and a newDeleteENTITYCommandobject is formed taking in the identifiedIndex. TheDeleteENTITYCommandis then encapsulated underCommandand passed back into theLogicManager. -
The
DeleteENTITYCommandcallsexecute(model). The execution of the command then interacts with theModelcomponent, and retrieves the unmodifiable view ofObservableList<ENTITY>. -
The
DeleteEntityCommandretrieves the correspondingENTITYto theIndex(as received in 3), and calls on thedeleteENTITY(ENTITYToDelete)method of theModel. -
The
Modelaccesses the relevant ENTITYBook and removes theENTITYToDelete. TheUithen “listens” to the changes in the ENTITYBook and updates the GUI. -
Finally,
DeleteENTITYCommandis then encapsulated as aCommandResultand passed into theLogicManager.
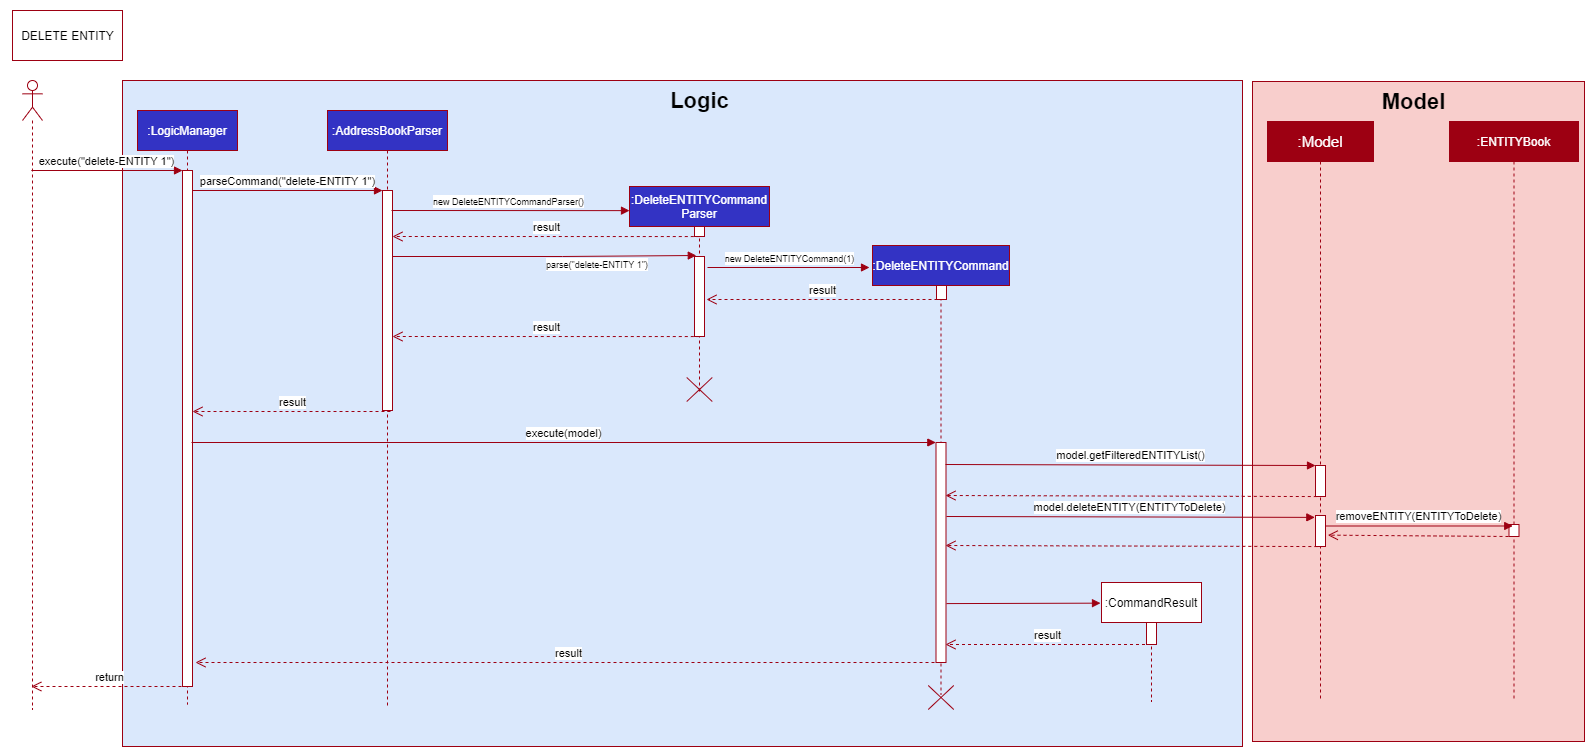
5.1 Delete Bidder Command
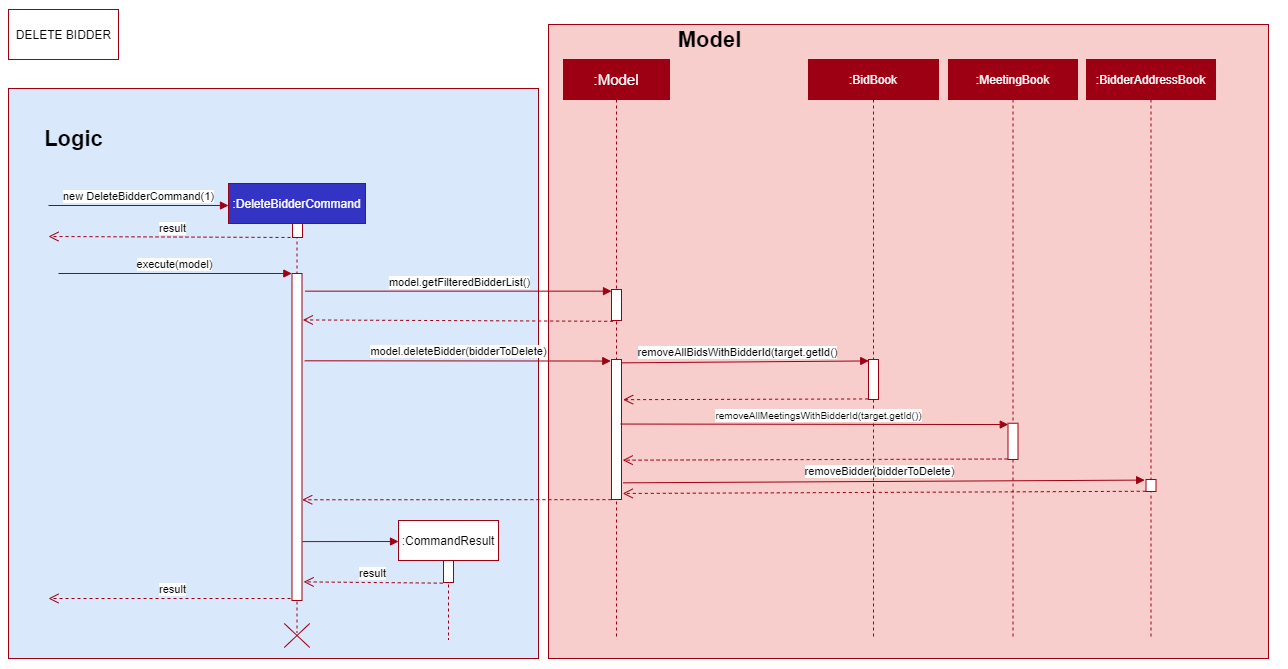
Logic portion of the sequence diagram shown subsequently is truncated to give more focus on the Model as the Logic implementation is similar to the above-mentioned. The DeleteBidderCommand deletes the bidderToDelete corresponding to to the index given in the user input.
The command varies as other entities tied to the bidderToDelete by the Id will be deleted as well, namely:
Bid and Meeting.
-
Upon retrieving the
bidderToDelete, thebidderToDelete’sbidderIdis then retrieved and passed intoremoveAllBidsWithBidderId(bidderId). -
BidBookin turn callsremoveAllWithBidder(bidderId)to iterate and delete through the list of bids containing the attribute ofbidderId. -
Step 1 and Step 2 are repeated but with
removeAllMeetingsWithBidderId(bidderId)andMeetingBook.
5.2 Delete Seller Command
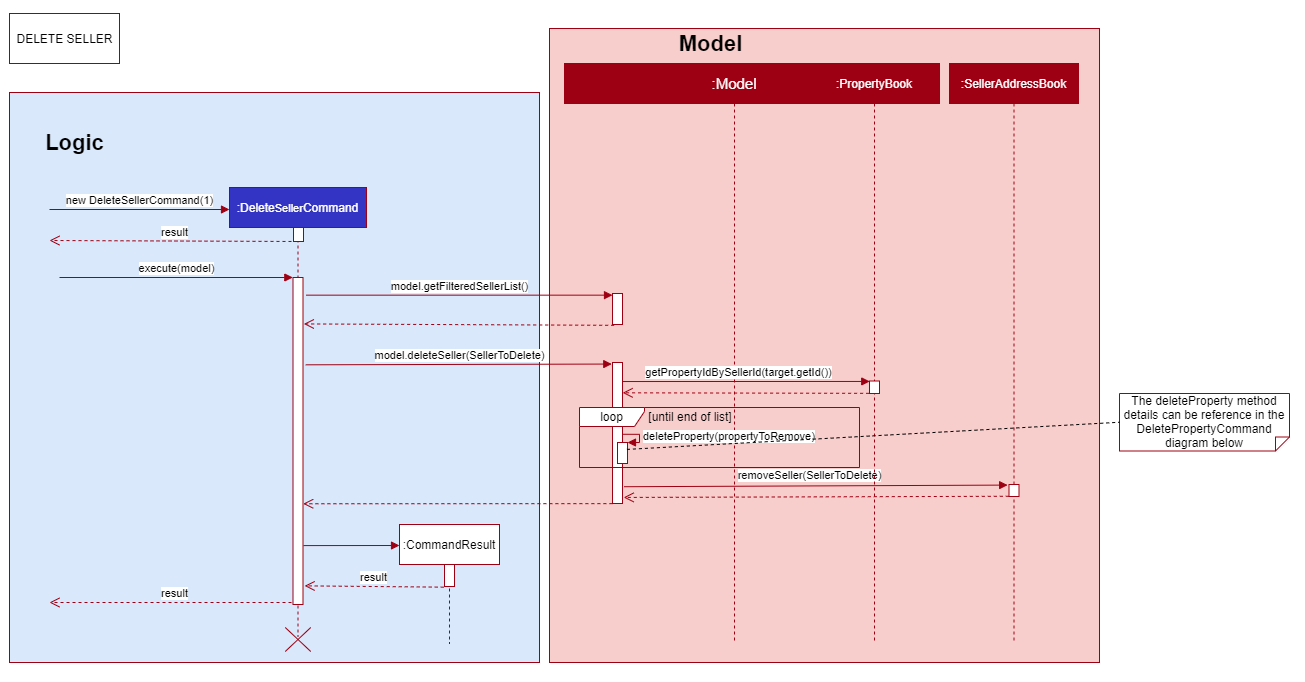
The DeleteSellerCommand deletes the SellertoBeDeleted corresponding to to the index given in the user input.
The command varies as other entities tied to the sellerToDelete by the Id will be deleted as well, namely:
Property. The deletion of the Property will in turn delete other entities (elaborated in 5.3).
-
Upon retrieving the
sellerToDelete, thesellerToDelete’ssellerIdis then retrieved and passed intoremoveAllBidsWithSellerId(sellerId). -
PropertyBookin turn callsremoveAllWithBidder(bidderId)to iterate and delete through the list of properties containing the attribute ofsellerId.
Design Considerations
Due to time constraint we decided to forgo certain attributes and features which would have distinctly separated Bidder
and Seller better (such as winning bidder). The implementation was designed with future extensions in mind.
This consideration applies to all Commands pertaining to Bidder and Seller, not just Delete.
-
Alternative 1 (current choice): Having
DeleteBidderCommandandDeleteSellerCommandextends fromCommandrather than a common command such asDeleteClientCommand.- Pros:
- Less coupling if an extension is required in the future
- Less refactoring was required from original implementation of AB3
- Cons:
- Unable to exploit polymorphism even though both
BidderandSellerhave a degree of similarity between both - Increases code complexity in
AddressBookParser
- Unable to exploit polymorphism even though both
- Pros:
{ End of Delete section written by: Kor Ming Soon }
5.3 Delete Property Command
{ Start of Delete Property section written by: Dianne Loh }
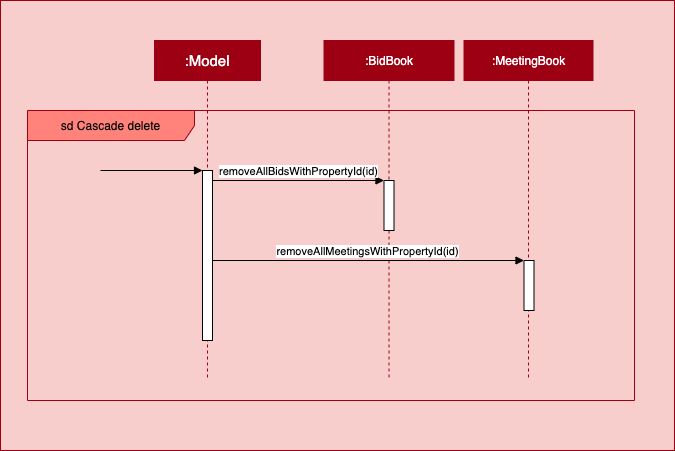
The DeletePropertyCommand can delete a property by either the index or property id. The DeletePropertyCommandParser will parse the user input into either an Index or PropertyId and create the DeletePropertyCommand. If the user is deleting the property by index, then targetId will be null and vice versa. The sequence diagram is shown below, starting from the creation of DeletePropertyCommand.
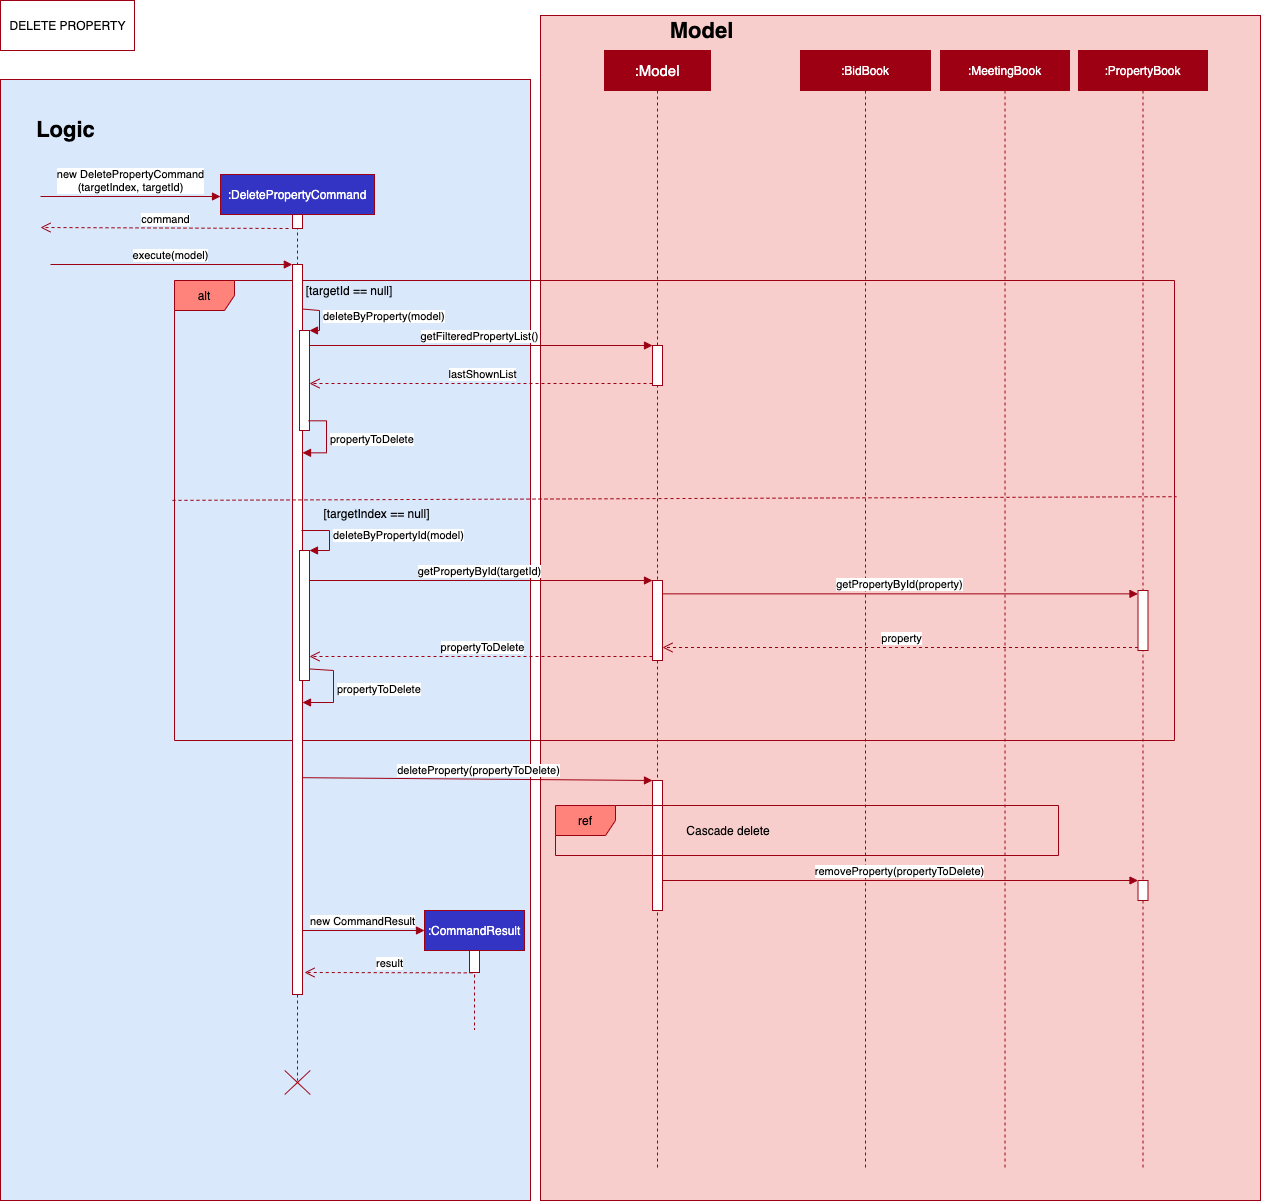
Upon deleting the property, all Bids and Meetings with the same PropertyId as the property being deleted will be deleted as well, as seen in the Cascade delete sequence diagram below:
{ End of Delete Property section written by: Dianne Loh }
6. List
{ Start of List section written by: Marcus Duigan Xing Yu }
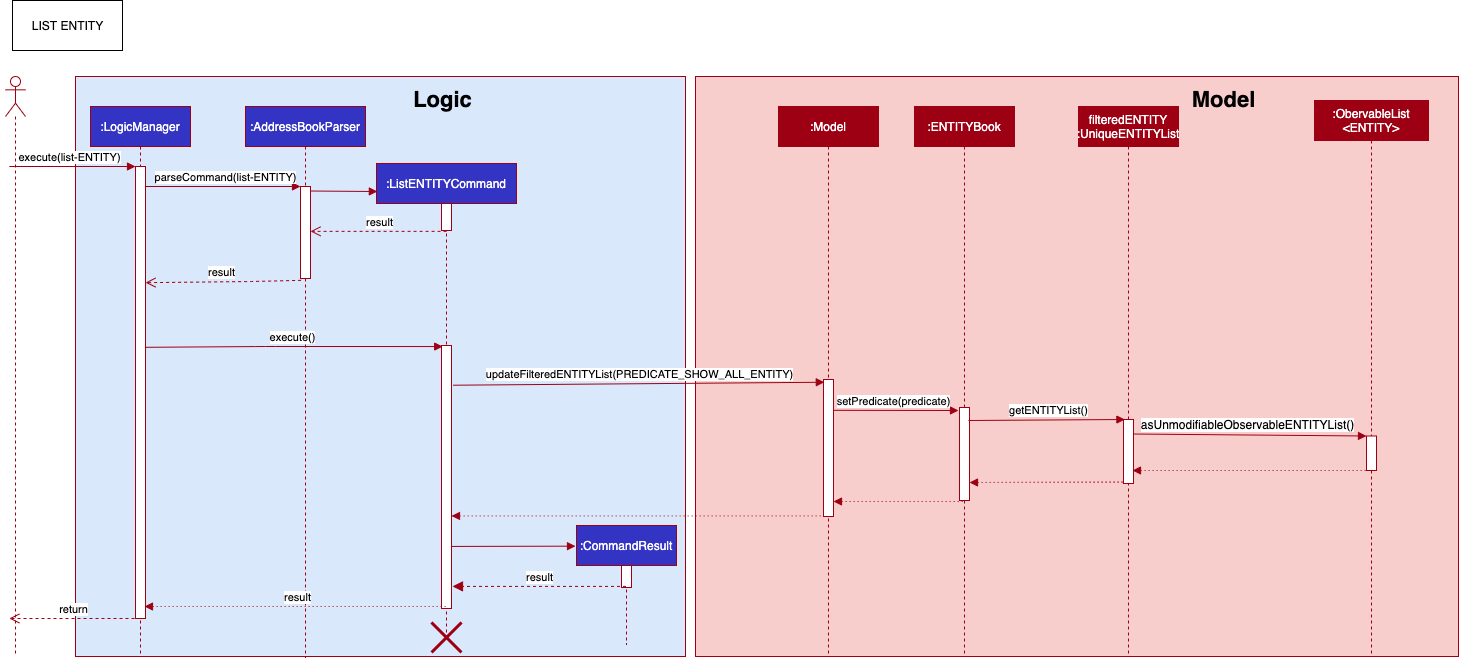
The List command applies to all entities in PropertyFree. All entities follow the same
implementation.
-
When the
Listcommand is executed by the user, the input it passed into theLogicManagerand thereafter parsed and identified inAddressBookParser. -
Upon identifying the relevant
COMMAND_WORDand by extension theENTITY(through the-input) , the correspondingListENTITYCommandobject is formed. -
The
ListENTITYCommandcallsexecute(model). The execution of the command then interacts with theModelcomponent, and retrieves the unmodifiable view ofObservableList<ENTITY>. -
The
ListEntityCommandthen calls on theupdateFilteredENTITYLISTmethod of theModeland applies the filter predicate of PREDICATE_SHOW_ALL_ENTITY. -
The
Modelaccesses the relevant ENTITYBook and displays the entire list in the ENTITYBook. TheUithen “listens” to the changes in the display for the ENTITYBook and updates the GUI. -
Finally,
ListENTITYCommandis then encapsulated as aCommandResultand passed into theLogicManager.
{ End of List section written by: Marcus Duigan Xing Yu }
UI Navigation Implementation
{ Start of Ui implementation section written by: Kor Ming Soon }
This section explains the Ui implementation in PropertyFree.
The implementation of Ui was implemented keeping in mind the constraint that the
target user is more inclined towards command line interface.
1. Automated TabBar Switching based on Command
Given that PropertyFree deals with a variety of different entities. The challenge was identifying the corresponding action and representing the right entity on the GUI.
The implemented is done as such:
-
Creation of an
EntityType(Enumeration) containing the following:BIDDER,SELLER,BID,PROPERTYandMEETING. -
CommandResultis given another attribute ofEntityType, and asetEntity(EntityType)method is created. The method is then called during the creation of theCommandResultobject at each command. -
The
CommandResultthen passes theEntityTypeinMainWindowto set theTabBaraccordingly to the entity relevant to command executed by the user.
The following activity diagram depicts the user journey and how the GUI responds accordingly in different scenarios.

2. Key-press UI Navigation
focus refers to the component of which the user is able to interact with at any given moment.Upon launch, the PropertyFree will set the focus in the CommandBox’s text field.
This section highlights three simple key-press Ui navigation feature.
- Navigating to next month in CalendarView:
CONTROL / CTRL+RIGHT ARROW KEY - Navigating to previous month in CalendarView:
CONTROL / CTRL+LEFT ARROW KEY - Navigating to
CommandBox’s text field (when not in focus):ENTER
The key-press navigation is implemented in MainWindow where the method handleFocusRequestWhenKeyPressed(CommandBox)
configures the primaryStage with an addEventFilter() to “listen” to the event when a key is pressed.
This in turns calls the method handle(KeyEvent) that runs and determine which key is pressed.
Thereafter executes one of the three possible navigation.
3. Calendar Navigation Command
Calendar Navigation Command serves to provide an alternative for users to view the CalendarView if the user’s keyboard
layout does not provide convenience for CONTROL + ARROW KEY.
Two commands are created to handle the user input:
NextCalendarNavigationCommandPrevCalendarNavigationCommand
The implementation of the two above-mentioned commands are largely similar to the ListENTITYCommand.
However, apart from passing the MESSAGE_SUCCESS to ResultDisplay, the CommandResult checks isCalendarNavigation()
and calls the handleToNext() or handleToPrev() method in CalendarView depending on the user command input.
{ End of Ui implementation section written by: Kor Ming Soon }
Documentation, logging, testing, configuration, dev-ops
Appendix A: Product scope
Target user profile:
- Has a need to manage a significant number of property details, seller details, buyer details as well as the various bid amounts
- is a Real Estate Agent with a clientele mostly based in Singapore
- Prefer desktop apps over other types
- Can type fast
- Prefers typing to mouse interactions
- is reasonably comfortable using CLI apps
Value proposition:
- Able to store all the property listings, bidders as well as seller details for easy access.
- Able to store the various bids which makes it easier for agents to access details of the bids.
- Generate a list of meetings which allows the agent to keep track of all the different meetings.
- Able to search through the different lists based on the different attributes for ease of access of information.
- Will be well suited for agents who have to track property listings, and associating it with the sellers of that specific property. Also, to track bidders who place a bid on any of the properties listed under the agent.
Appendix B: User stories
Priorities: High (must have) - * * *, Medium (nice to have) - * *, Low (unlikely to have) - *
| Priority | As a … | I want to … | So that I can… |
|---|---|---|---|
* * * |
Real estate agent | add a new property listing | add a new property entry when a seller wants to sell a new property |
* * * |
Real estate agent | add bidder or seller | keep track of bidders or sellers involved |
* * * |
Real estate agent | view the list of interested sellers | keep track of property owners |
* * * |
Real estate agent | delete a property listing | remove listings that are closed or the sellers do not wish to sell |
* * * |
Real estate agent | search the properties by id, name or area etc | filter properties according to my criteria |
* * * |
Real estate agent | add bids to my properties | keep track of my customers’ bids |
* * * |
Real estate agent | delete bids | remove bids that are withdrawn by the bidders |
* * * |
Real estate agent | view the current bids organised by property, sellers and buyers | keep track of the bids |
* * * |
Real estate agent | create meetings | set-up meetings easily with bidders and sellers for property |
* * * |
Real estate agent | view the list of meetings | keep track of all my meetings |
* * * |
Real estate agent | delete meetings | remove meetings that are no longer happening |
* * |
Real estate agent | edit the property listing | ensure that the property information is accurate |
* * |
Real estate agent | label a property as a rental or not | to give options for buyers who may wish to rent only |
* * |
Real estate agent | label the type of property the property is | filter out specific properties based on the type buyers wish to buy |
* * |
Real estate agent | edit bids | edit bids to ensure the information is accurate |
* * |
Real estate agent | edit meeting details | ensure that meeting details are accurate in case of changes |
* |
Real estate agent | mark a property as sold | keep track on which houses are already sold without having to delete it |
* |
Real estate agent | see the historical transactions | track my performance |
* * * |
Busy real estate agent | delete bids or meetings related to properties/bidders that i delete | ensure that any invalid bids/meetings are conveniently removed |
* * * |
Busy real estate agent | delete properties related to a seller that I delete | ensure that any invalid properties are conveniently removed |
* * * |
Busy real estate agent | delete properties related to a seller that I delete | ensure that any invalid properties are conveniently removed |
* * |
Busy real estate agent | see what is the highest bid amount for a property | quickly check if the highest bid amount is satisfactory for the seller |
* * |
Busy real estate agent | schedule meetings such that it can warn me if there is any clashes in meetings | ensure my schedule will not be problematic due to unintended clashes |
Appendix C: Use cases
(For all use cases below, the System is the PropertyFree and the Actor is the Real Estate Agent, unless specified otherwise)
For our product, we have different entities such as Meeting Bid Bidder Seller Property. However across the different entities,
the implementations are rather similar.
Therefore, below we will use ENTITY to generalise the different entities and then provide use
cases for the general entity. If any of the features have a different implementation, we will provide the alternative use case below.
1. Use case: Delete an ENTITY from the list
MSS
- User requests to list an
ENTITY - PropertyFree shows a list of the
ENTITY - User requests to delete a specific
ENTITYin theENTITYlist -
PropertyFree deletes the
ENTITYUse case ends.
Extensions
-
2a. The list is empty.
Use case ends.
-
3a. The given index is invalid.
- 3a1. PropertyFree shows an error message.
Use case ends.
Special cases
- In the case when the
ENTITYisBidder, a deletion of theBidderwill result in the deletion of the associatedbidsandmeetings -
In the case when the
ENTITYisSeller, a deletion of theSellerwill result in the deletion of the associatedProperty - In the case when the
ENTITYisProperty, a deletion of thePropertywill result in the deletion of the associatedbidsandmeetings
2. Use case: Add an ENTITY
MSS
- User requests to add a
ENTITY - PropertyFree adds the
ENTITYto the list
Use case ends.
Extensions
- 2a. The input format is invalid.
- 2a1. PropertyFree shows an error message.
Use case ends.
- 2a1. PropertyFree shows an error message.
- 2b. The given
ENTITYalready exists in the list.- 2b1. PropertyFree shows an error message.
Use case ends.
- 2b1. PropertyFree shows an error message.
- 2c. The given
ENTITYis given invalid inputs.- 2c1. PropertyFree shows an error message.
Use case ends.
- 2c1. PropertyFree shows an error message.
3. Use case: View a list of ENTITY
MSS
- User requests for a list of
ENTITY. - PropertyFree shows a list of
ENTITY.
Use case ends.
Extensions
- 2a. The list of
ENTITYis empty.
Use case ends.
4. Use case: Edit an Existing ENTITY from the respective list
MSS
- User requests to edit a
ENTITY. - PropertyFree shows the new
ENTITYdetails.
Use case ends
Extensions
- 1a. User enters an invalid input.
- 1a1. PropertyFree shows an error message.
Use case ends.
- 1a1. PropertyFree shows an error message.
- 1b. User enters attributes that result in a duplicate attribute.
- 1b1. PropertyFree shows an error message.
Use case ends.
- 1b1. PropertyFree shows an error message.
5. Use case: Find an Existing ENTITY from the respective list
MSS
- User requests to find a
ENTITY. - PropertyFree shows the
ENTITYdetails that match the attributes that the user has keyed in.
Use case ends
Extensions
- 1a. User enters an invalid input.
- 1a1. PropertyFree shows an error message.
Use case ends.
- 1a1. PropertyFree shows an error message.
6. Use case: Sort an Existing ENTITY from the respective list
MSS
- User requests to sort an
ENTITYlist. - PropertyFree shows the sorted
ENTITYlist.
Use case ends
Extensions
- 1a. User enters an invalid order input.
- 1a1. PropertyFree shows an error message.
Use case ends.
- 1a1. PropertyFree shows an error message.
Non-Functional Requirements
- Should work on any mainstream OS as long as it has Java
11or above installed. - Should be able to hold up to 500 Entities (Property, Bidder, Seller, Bid, Meeting) without crashing.
- A user with above average typing speed for regular English text (i.e. not code, not system admin commands) should be able to accomplish most of the tasks faster using commands than using the mouse.
- The product should be able to work without an internet connection.
- The product should be able to save all changes to storage locally.
- The product should not take above 10 seconds to execute any commands.
Glossary
-
Mainstream OS: Windows, Linux, Unix, OS-X *Seller - A seller is the owner of a property that wants to list their house for sale. It is assigned a unique Seller Id.
-
Bidder - A bidder is a person who wishes to bid for the purchase of a certain property. It is assigned a unique Bidder Id.
-
Property - A property is a listed estate that is up for bidder to place bids on. A property can only be added if the given Seller Id exists in the seller list. It is assigned a unique Property Id.
-
Bid - A Bid is an offer attempt by a bidder for a specific property. A bid can only be placed if the given Property Id and Bidder Id exists in the property list and bidder list.
-
Meeting - A meeting can be of 3 types.
- View - For viewing of properties.
- Admin - For general admin meetings.
-
Paperwork - For signing of paperwork related to the selling and buying of the property.
Appendix: Instructions for manual testing
Given below are instructions to test the app manually.
Launch and shutdown
-
Initial launch
-
Download the jar file and copy into an empty folder
-
Run
java -jar PropertyFree.jar.Expected: Shows the GUI with a set of sample data. The window size may not be optimum.
-
-
Saving window preferences
-
Resize the window to an optimum size. Move the window to a different location. Close the window.
-
Re-launch the app by
java -jar PropertyFree.jar.Expected: The most recent window size and location is retained.
-
-
Subsequent launch
-
Run
java -jar PropertyFree.jar.Expected: Shows the GUI with data loaded from the json files.
-
Testing Bidder and Seller Features
Bidder and Seller can be tested similarly.
For example: in the following segment, Adding a bidder while all bidders are being shown., the command which is given for bidder
add-b can be changed to add-s. The output will be similar to that as mentioned but in the context of Seller instead.
Adding a bidder while all bidders are being shown.
-
Prerequisite: No other bidders have the exact same name or same phone number.
-
Restriction: Name cannot exceed 26 characters with spaces included and the phone number cannot exceed 10 digits (inclusive).
-
Test case:
add-b n/Kor Ming Soon p/8222222Expected: A bidder with the name:
Kor Ming Soon, phone:82222222will be created and assigned a uniqueBidderId. A visualTagwith the rolebidderis also assigned.New bidder added: Name: Kor Ming Soon Phone number: 82222716 Id: B1 Tag: bidder
Edit a bidder while all bidders are being shown.
-
Prerequisite: A bidder exists inside the bidder list with the index
3, this will also imply that there are bidders indexed at1and2as the indexes are sequentially ordered. -
Restriction: No other bidders have the exact same name or same phone number.
-
Test case:
edit-b 3 n/Nigel Ng Yong ShengExpected: The bidder which belongs at index 3, will have his or her name edited to the input which is
Nigel Ng Yong Sheng. Other details of the bidder will remain the same (i.e phone number, tag, and Bidder Id).Edited Bidder: Name: Nigel Ng Yong Sheng Phone number: 82222716 Id: B3 Tag: bidder -
Test case:
edit-b 2 p/1784695Expected: The bidder which belongs at index 2, will have his or her phone number edited to the input which is
1784695. Other details of the bidder will remain the same (i.e name, tag, and Bidder Id).Edited Bidder: Name: Kor Ming Soon Phone number: 1784695 Id: B1 Tag: bidder
Delete a bidder while all bidders are being shown.
Note that bidder and seller delete functions are slightly different, and both will be elaborated.
-
Prerequisite: A bidder with exists inside the bidder list with the index
3, this will also imply that there are bidders indexed at1and2as the indexes are sequentially ordered. -
Test case:
delete-b 3Expected: The bidder which belongs at index
3, will be deleted. The result display would output the information of the bidder who was deleted (i.e name, phone number, tag and id). In addition, allMeetingandBidwhich contain theIdof the bidder who was deleted will be deleted as well.Deleted Bidder: Name: Nigel Ng Yong Sheng Phone number: 82222716 Id: B3 Tag: bidder All related bids and meetings have been deleted.
Delete a seller while all sellers are being shown.
Note that bidder and seller delete functions are slightly different, and both will be elaborated.
-
Prerequisite: A seller with exists inside the seller list with the index
3, this will also imply that there are sellers indexed at1and2as the indexes are sequentially ordered. -
Test case:
delete-s 3Expected: The seller which belongs at index
3, will be deleted. The result display would output the information of the seller who was deleted (i.e name, phone number, tag and id). In addition, allPropertywhich contains theIdof the seller who was deleted will be deleted as well. Property in turn will delete allBidandMeetingrelating to the Property’sId.Deleted Seller: Name: Kor Ming Soon Phone number: 1784695 Id: B2 Tag: bidder All related bids and meetings have been deleted.
Find a bidder while all bidders are being shown.
-
Prerequisite: A bidder with a name containing
Koris inside the bidder list. -
Test case:
find-b KorExpected: The list will be filtered accordingly to the user input, which in this case is
Kor, so all bidders whose name containKorwill be shown.1 bidder(s) listed!Note that the names which are filtered contain the name
Korin full (i.e other names such asKoreorexampleKorwill not be filtered.)
List a bidder while only some bidders are being shown.
-
Prerequisite: The bidder list is currently filtered (i.e a
findcommand has been executed). -
Test case:
list-bExpected: The list will show in full all the bidders who are existing in the list.
Displaying full bidder list.
Testing Property Features
Adding a property while all property are being shown.
-
Prerequisite: Seller id must exist inside the seller list.
- Restrictions:
- Price must be greater than 0 and less or equals to 1 trillion.
- Price will be truncated to 2 decimal places.
- PropertyName, Address and PropertyType have a maximum of 100 characters.
-
Test case:
add-p n/Sunrise s/S1 ap/100 t/Landed a/99 Sunrise Street r/NoExpected: A property with the name:
Sunrise, seller id:S1, asking price:$100.00, property type:Landed, address:99 Sunrise Street(note that the is_Rental will only be reflected if ther/input isyes).New property added: Sunrise Property Id: P1 Address: 99 Sunrise Street Property type: Landed Asking price: $100.00 Seller Id: S1
Listing a property while some property are being shown.
-
Prerequisite: The property list is currently filtered (i.e a
findcommand has been executed). -
Test case:
list-pExpected: The list will show in full all the properties that are existing in the list.
Displaying full property list.
Editing a property while all property are being shown.
- Prerequisite:
- A property exists inside the property list with the index
3, this will also imply that there are property indexed at1and2as the indexes are sequentially ordered. - No other properties in the list contain the address “23 Cove Street”.
- A property exists inside the property list with the index
- Restrictions:
- Address is unique and the user input (if editing address) must not match any other properties’ address in the list.
-
Test case:
edit-p 1 n/Cove Residences a/23 Cove StreetExpected: A property indexed at 1 will be edited with the new information name:
Cove Residences, address:23 Cove Street. The other fields will remain unedited.Edited Property: Cove Residences Property id: P4 Address: 23 Cove Street Property type: HDB Asking price: $99.00 Seller id: S20
Deleting a property while all property are being shown.
-
Prerequisite: property exists inside the property list with the index
3, this will also imply that there are property indexed at1and2as the indexes are sequentially ordered. -
Test case:
delete-p 3Expected: A property indexed at 3 will be deleted. The result display would output the information of the property that was deleted (i.e name, seller id etc). In addition, all
BidandMeetingrelating to the deleted property’sIdwould be deleted as well.Deleted Property: Sunrise Avenue Property id: P23 Address: Block 123 Property type: HDB Asking price: $100.00 Seller id: S2 All related bids and meetings have been deleted.
Finding a property while all property are being shown.
- Restrictions:
- The search is case insensitive, all attributes e.g cove will match Cove
- Only full words will be match e.g sun will not match sunrise
- Properties matching at least one keyword will be considered a match e.g sunrise view will match sunrise avenue when
sunis input - At least one optional field is required.
-
Test case:
find-p n/Cove Sunrise ap/<= 100 r/noExpected: Displays all properties whose names contains either Cove or Sunrise, asking price is less than or equals to 100, and is not a rental property.
2 properties listed!
Testing Bids Features
For all test cases for bid features, the GUI will automatically switch to the bid tab.
Adding a Bid
-
Prerequisites: Bidder with bidder id
B1and property with property idP2exists in the respective lists. - Restrictions:
- Price must be more than 0 and less or equals to 1 trillion.
- Price will be truncated to 2 dp.
- Cannot add a bid that already exists in the list. Bids are considered the same if both their property id and bidder id are the same.
-
Test case:
add-bid b/P1 c/B2 m/150000.20.Expected: The new bid is added to the bid list with the following message displayed:
New bid added:
Bid of $150000.20
by B2
to property: P1
View Full List of Bids
-
Test case:
list-bid.Expected: All bids will be displayed on the GUI, with the following message displayed:
Displaying full bid list.
Deletion of Existing Bid
-
Prerequisites: The bid to be deleted must exist in the bid list.
-
Test case:
delete-bid 1.Expected: The bid at index 1 is deleted, with the following message displayed:
Deleted Bid:
Bid of $150000.20
by B2
to property: P1
The exact information depends the bid being deleted.
Editing a Bid
-
Prerequisites: The bid to be edited must exist in the bid list.
- Restrictions:
- At least one optional field must be provided.
- All restrictions and prerequisites from Adding a Bid hold.
-
Test case:
edit-bid 1 b/P99 c/B12 m/1.20Expected: The bid at index 1 will be updated to the new values, with the following message displayed:
Edited Bid:

FROM:
Bid of $999999.00
by B2
to property: P3

TO:
Bid of $1.20
by B12
to property: P99
The exact information depends on the bid being edited.
Find a specific bid based on key words
-
Test case:
find-bid P1 B2 $65000.00.Expected: All bids whose attributes matches at least one keyword will be displayed, with the following message displayed:
1 bid(s) listed!The number of bids listed corresponds to the number of bids that match the keywords.
Testing Meeting Features
For all test cases for meeting features, the GUI will automatically switch to the meeting tab.
Add a Meeting
-
Prerequisites: A bidder with bidder id
B1and a property with property idP1must exist in their respective lists. - Restrictions:
- Meeting type is either
vforviewing,a, foradminorpforpaperwork. - Date is of the format
DD-MM-YYYYand cannot be a past date. - Time is of the format
HH-MM. The timings can clash each other and the hours and minutes will overflow (eg24:30is same as00:30). - Cannot add meeting that already exists in the list. Meetings are considered the same if both their venue, date , start time and time are the same.
- Meeting type is either
-
Test case: add-m q/v b/B1 p/P1 v/2 ALBERT PARK d/11-12-2021 s/12:30 e/13:00
Expected: Adds the meeting to the meeting list, with the following message displayed:
   New meeting added:
   Meeting Type: Viewing
   Bidder Id: B1
   Property Id: P1
   Venue: 2 ALBERT PARK
   Date: 11-12-2021
   Start Time: 12:30
   End Time: 13:00
Deleting an Existing Meeting
-
Prerequisite: The meeting to be deleted must exist in the meeting list.
-
Test case: delete-m 3.
Expected: The meeting at index 3 will be deleted, with the following message displayed:
Deleted Meeting:
Meeting Type: Viewing
Bidder Id: B1
Property Id: P1
Venue: 2 ALBERT PARK
Date: 11-12-2021
Start Time: 12:30
End Time: 13:00
The exact information depends on the meeting being deleted.
View the List of All Meetings
-
Test case:
list-mExpected: Displays all the meetings in the meeting list, with the following message displayed:
Displaying full meeting list.
Editing an Existing Meeting
-
Prerequisite: The meeting to be edited must exist in the meeting list.
- Restrictions:
- At least one optional field is required.
- The prerequisites and restrictions of Adding a Meeting hold.
-
Test case:
edit-m 2 v/eunos.Expected: The meeting will be updated to the provided values, with the following message displayed:
 Edited Meeting: Admin
 Bidder Id: B12
 Property Id: P12
 Venue: eunos
 Date: 12-05-2016
 Start Time: 12:30
 End Time: 13:00
Sorting the existing Meeting List
-
Test case:
sort-m o/asc.Expected: Sorts the meeting list in ascending order according to meeting date, with the following message displayed:
Successfully sorted meeting
Finding an Existing Meeting
- Restrictions:
- At least one optional field is required.
-
Test case:
find-m b/B1 v/bedokExpected: Displays all the meetings whose attributes matches the specified keywords, with the following message displayed:
2 meeting(s) listed!
The actual number depends on the number of meetings that fulfil the criteria.
Calendar Navigation Features
Navigating to the Next Month in the Calendar
-
Test case:
nextExpected: Displays the next month in the calendar, with the following message:
Display next month of Calendar
Navigating to the Previous Month in the Calendar
-
Test case:
prevExpected: Displays the previous month in the calendar, with the following message:
Display previous month of Calendar
Testing Keyboard Navigation
Focus on CommandBox
-
Prerequisite: When the
CommandBoxis not in focus (i.e. the cursor is not blinking). -
Test case:
PRESS ENTERExpected: The
CommandBoxwill be brought into focus.
Next Month in Calendar
-
Test case:
PRESS CTRL + RIGHT ARROW KEY - Windows OS
    or
    PRESS CONTROL + RIGHT ARROW KEY - Mac OS
Expected: Displays the next month in
Calendar.
Previous Month in Calendar
-
Test case:
PRESS CTRL + LEFT ARROW KEY - Windows OS
     or
     PRESS CONTROL + LEFT ARROW KEY - Mac OS
Expected: Displays the previous month in
Calendar.